Showing posts with label Spellbinders. Show all posts

Sunday, September 3, 2023

Spellbinders Betterpress Christmas Cards

Hello friends! I have a couple Christmas cards to share featuring Spellbinders Betterpress Plates and dies. I wish I could show you the awesome impressions that the photos do not pick up. 

The first card features the Most Wonderful Time Press Plate nd the Notched Corner Frames Dies. 


I created a shaped card using the Notched Corner dies. I inked the top layer using Distress Oxide inks: Faded Jeans, Broken China, Salvaged Patina. I love the font of of this Press Plate. I added some poinsettias from the Christmas Blooms Dies as little accents and splattered some silver shimmer. For a finishing touch I added some silver gems.


The second card was created using the new Joyeux Noel Press Plate. I just adore this bird image. I water colored the image and added gold splatter. The sentiment was foiled from the Poinsettia Spray Glimmer of the Month.


I cut the Mirror Gold frame using the Notched Corner Dies. I added some shimmery gold splatter for a finishing touch and adhered the layers to an A2 top folding red card base.


Thank you so much for stopping by! I hope you have a blessed day :)


Supplies Used:
Most Wonderful Time Press Plate
Notched Corner Frames Die
Silver Mix Essential Gems
Christmas Blooms Dies
Joyeux Noel Press Plate
Mirror Gold Cardstock
Poinsettia Spray (GOM Oct 22) Sentiment


Saturday, September 2, 2023

Spellbinders Snow Garden Collection

Hi crafty friends! I am back again today with a couple more cards from Spellbinders Snow Garden Collection. I was able to do some crafting these past few weeks and I had so much fun working with these new dies! It's another busy month of doctor appointments with my mom and dad but hopefully I will be able to steal a few moments in my craft room again this month. 

I wasn't sure at first while I was cutting these new dimensional floral dies out and inking them but after gluing them together they turned out so pretty!

This winter floral collection is just gorgeous. For the first card I created a birthday card using the new Crocus and Ladybugs Etched Dies. I have a lot of friends and family with winter birthdays! I cut the florals, leaves and ladybugs out of white cardstock. I inked the flowers and leaves using Distress Oxide inks in Wilted Violet, Shaded Lilac and Peeled Paint. I used an embossing stylus with a balled end to help give the flowers shape. 

I cut a layer using the new Notched Corners Die out of Bristol Smooth cardstock and inked the background. The sentiment was hot foiled using gold foil. I embossed the background layer using the Holly Flourish Embossing Folder. The little ladybugs were colored using Copic markers. The 3D florals really give a 'wow' factor to the card!

I decided to make a thank you card for the second one. I cut the florals out of both white and light blue cardstock and inked them using Distress Inks: Faded Jeans, Shaded Lilac, Peeled Paint.

I also used the Notched Corner Dies to foil the sentiment and inked up the background using Distress Oxides: Faded Jeans, Shaded Lilac and Salvaged Patina. I added a frame of the Mirror Gold cardstock and adhered it to the layer that I embossed using the Floral Frenzy 3D Embossing Folder. 


I'm so happy to be crafting again even if it is just for a week. I linked all the supplies I used below. These are affiliate links but do not cost you anything to use them. I hope I inspired you to create some dimensional flowers on your cards. Have a blessed day :)


Supplies Used:

Friday, September 1, 2023

Spellbinders Better Press Fall Themed Cards

Hello friends! I know it has been quite a while since my last post. Life has been a bit overwhelming and I've needed to step back from crafting to focus on family. My elderly parents who live an hour away, have needed me to help care for them and assist with their medical needs and transportation. It is a new season for sure and I'm doing the best I can to make sure they have everything they need. 

I was blessed and gifted the new Spellbinders Betterpress from a sweet friend. It is truly amazing and it is near impossible to show the detail in the photos. Please trust me when I say the impression is impressive in person! If I'm able to, I will try to get a video of my projects to show the impact of the Better Press. Spellbinders sent me some samples to play with and so I have created several cards that I will be sharing over the next couple days. Here are the Fall themed cards I created.


This first card I used Strathmore water color paper and the new Betterpress Autumn Floral Corner Press Plate. It is so pretty! I used the ink that came with the Betterpress. The indentation of the image and sentiment is fantastic! I've been wanting to try water coloring and think this first try came out pretty good. I tried my best to leave some white space which is not easy for me since I'm so used to coloring with Copic markers. I added some gold splatter and embellished with the Gold Mix Color Essentials Gems. I adhered the layer to an A2 top folding kraft card base.


For the second card, I used the new Betterpress Autumn Thanks Frame. I think my water coloring improved and I did a bit better with the white space. I also used the new Notched Corner Frames Dies to for the sentiment layer and frame. I used the Mirror Gold Cardstock to add that pop of gold.

I added gold splatter and adhered the panel to an A2 top folding kraft card base. I think this one is my favorite of the two and the impression of both the image and sentiment are so cool!

I've linked all the supplies I used below. These are affiliate links but do not cost you anything extra to use them. I hope I inspired you and thank you so much for stopping by! Have a blessed day :)

Supplies Used:


Wednesday, June 7, 2023

Spellbinders Hello Blooms Stencil

Hello crafty friends! I have a couple cards I want to share from Spellbinders May release featuring the Glimmer Cardfronts Sentiments collection. I used the new Hello Blooms Stencil & Die Bundle to create these two cards. I hope you like them.

For my first card, I inked up the layering stencil using Distress Oxide inks. I cut the sentiment and the florals with the dies that are included. The hello was cut using the Gold Mirror Cardstock. For the background I used the Floral Frenzy 3D Embossing Folder. For a finishing touch I added some Teal Color Essential Gems. 

For my second card, I partially stenciled the florals onto an A2 sized layer of cardstock. I hot foiled the new Best Wishes On Your Birthday Glimmer Hot Foil Plate using Glimmer Hot Foil in Gold. this card came together so easily! The stencil is so easy to use and lines up well. 

For a finishing touch I added a few Prism AB Color Essential Gems. They have a purplish tint to them that coordinates perfectly with the purple florals. 


Thank you so much for stopping by! I hope you like my cards and that you will check out this fantastic release in the Spellbinders shop. Have a blessed day :)


Supplies


Monday, May 8, 2023

Spellbinders Cards Stylish Ovals Collection

Hello crafty friends! I have some cards to share that I created using Spellbinders' April release Stylish Ovals Collections. I absolutely LOVE this new product and I hope you will check them out. All the supplies I used are listed and linked below :)

This first couple cards both feature the gorgeous new Stylish Oval Floral Bird Glimmer Hot Foil Plate. This might be my most favorite hot foil plate yet! 

I hot foiled the bird design using the Gold Foil onto an A2 layer of white card stock. I colored up the image using Copic markers. To frame the image I used the Infinity Punch & Pierce Plate Etched Dies. This die has so many layers and I just used the outermost die cut for my cards. For a finishing touch I added some bling from the Gold Mix Color Essentials Gems.


For my second card I hot foiled the bird onto pink card stock using Spellbinder's pink hot foil. I colored the image with just pinks and greens and cut it out using the new Essential Stylish Ovals Etched Dies. I love this oval die set because it is so unique and I hope to use it again on upcoming projects. I added a foiled and die cut sentiment from Yana's Sentiments Glimmer Hot Foil Plate & Die Set.


Next I added a layer of white card stock to frame the image and adhered it over the Infinity Punch & Pierce Plate frame that I cut using a darker shade of pink card stock. I added double sided adhesive foam tape to pop it up and add some dimension. For a finishing touch, I added bling from the Pink Color Essential Gems. I adhered the panel onto a white A2 sized top folding card base so the white would peek through the cutouts.


For my last card, I used the new Stitched Floral Flip Frame Etched Dies. I cut the florals out in a variety of pastel colored card stock and sent them through again using the embossing pad to get the etched lines. It is difficult to see the lines in the photo. This die is a stitching die but as you can see, you can use it as a decorative die. I do love to do the stitching but sometimes you may not have the time. This die cuts out the little holes and adds the lines. 


I inked around the edges of the die cuts to add a bit of dimension. The die cuts out in two parts and I doubled up to add the top and bottom creating the perfect frame for a sentiment. I used the Yana's Special Sentiments Glimmer Hot Foil Plates & Die and directly foiled it onto the center of a white card stock layer. For a finishing touch I added bling from both the Gold Mix and Pink Essential Gems.


Thanks so much for stopping by today! I hope you like my cards and will check out the supllies I listed below. Have a great day :)

Supplies Used:


Friday, December 23, 2022

Spellbinders Layered Windmill Quilt Cards

Hi crafty friends! I have a couple cards to share featuring Spellbinders and Becca Feeken's Home Sweet Quilt Collection. All the supplies I used are listed and linked below. Here is what I created:

I made a couple top folding 5.5"x 5.5" cards to showcase the new Layered Windmill Etched Dies. The die set measures 5 inches across and you can even create a shaped card if you wanted. I decided to go with a square shape.

I absolutely LOVE these quilt dies! They really give you the opportunity to use the patterned papers in your stash and if you're like me, you might have a ton of it! I chose this floral pattern from a 6x6 inch paper pad in my stash and also chose some coordinating cardstock and cut them out. 

For my first card I stamped and embossed the sentiment from the new Quilty Hugs Sentiments Clear Stamps using gold embossing powder. I cut it out using the banner die that is included in the More Sentiments Glimmer Hot Foil Plates and popped it up with foam tape. I used the new Orange Peel Quilt 3D Embossing Folder for the background layer. These 3D folders are amazing! The little flowers that I added are from the Wreath Builder Dies. I cut the flower centers out with the Mirror Gold Cardstock.

For my second card I cut a five inch square of patterned paper from that same paper pad as the florals and adhered the quilt onto it. I stamped and embossed the Quilty Hugs sentiment and hand cut a fishtail banner. I also embellished with some of the little flower dies with gold centers.

I hope you like my cards and will check out these amazing dies! There is also a fantastic sale going on at Spellbinders right now. Have a great day!


Supplies Used:


Wednesday, December 14, 2022

Spellbinders Patchwork Petals

Hello crafty friends! Here are the last of my Christmas cards for 2022! I had so many plans to create with the amazing products that I purchased this year and as usual, I ran out of time. However, I am considering participating in the Christmas year round challenges in 2023 that some of my crafty friends did this past year.

This card set was so much FUN to create!! I used the new Spellbinders Patchwork Petals Etched Dies by Becca Feeken. The entire collection is amazing and I have many more upcoming projects to share using some of  her dies. All the supplies I used are linked and listed below :)

For all four cards I used the same patterned paper pack from my stash. It's the DCWV Winter Frost 6"x6" mini stack. I cut out the papers with the patterned die four times. I also cut it out in white card stock and blue cardstock. Then like a puzzle, I glued all the pieces and adhered them to the square die cut included with the set. The papers have silver foil accents that I coordinated with the Glimmer Hot Foil- Silver for the sentiment and the Mirror Silver Cardstock.

For the first two cards I chose the bird from the Sweet Birdie die set. The pine branches are from the Holiday Blooms and the sparkly leaves are from the Sealed Wild Flowers Etched Dies.


The sentiment is from the Glitter Wishes Hot Foil Plates and the Glimmer Hot Foil- Silver. I thought the sentiment worked our PERFECTLY!! The poinsettias and holly leaves are also from the Holiday Blooms dies.


For a finishing touch I added some bling using the Teal Color Essential Gems. I like how the die cuts add dimension but not bulk so these will be easy to mail. I hope you like my cards!

You can check out all the amazing products at the Spellbinders shopThanks so much for stopping by! Have a wonderful holiday!

Supplies Used:


Saturday, December 10, 2022

May Your Christmas Be Furry & Bright

Hi crafty friends! I have a Christmas card to share featuring the amazing new Essential Hearts dies and the Essential Solid Heart Glimmer Hot Foil Plate from Spellbinders. I was hoping they would come out with the heart shape in their collection! 


Hearts are not just for Valentine's Day and can be used in a Christmas design as well! I used the red foil from the Holiday Blooms Etched Dies for this card. It looks even prettier in person! The florals are from the Holiday Blooms Etched Dies. I used the Mirror Gold Cardstock for one of the branches and embossed the sentiment using gold embossing powder to coordinate with it. I then added the gold gems to the center of the poinsettia. 


I also used the adorable pup from the Christmas Pups Clear Stamps and colored him using Copic markers. The background was created using the Ski Lodge Embossing Folder for an extra festive touch!


Thanks so much for stopping by! I hope you like my card. The supplies I used are listed below. I hope you have a great day :)


Supplies Used:


Monday, November 21, 2022

On Your Special Day

Hi crafty friends! I have a card to share featuring the gorgeous new Spellbinders Glimmering Just For You Hot Foil Die. 

I love how the silver foil looks on blue cardstock. It was so easy to hot foil the floral image and sentiment and color it using Copic markers.


 For a finishing touch I added some sparkly gemstones.

Thanks so much for stopping by! Have a great day :)

Products Used:


Wednesday, November 9, 2022

Spellbinders Floral Reflections New Release

 Hi Crafty friends! I have a couple cards to share featuring the new floral Reflections release from Spellbinders. You can find the list of the supplies that I used below.


For my first project I created a slimline card. For the background I trimmed a panel of white card stock at 3.5"x 8.5" and used the gorgeous new Floral Frenzy 3D Embossing Folder to emboss it. The texture is amazing!! For floral dies are from the new Sealed Wildflowers. I cut the greenery and florals using a variety of colored card stock and arranged them like a bouquet. I foiled the sentiment from the Everyday Sentiments II Glimmer Hot Foil Plates with gold foil. For a finishing touch I added some sparkly gem stones.


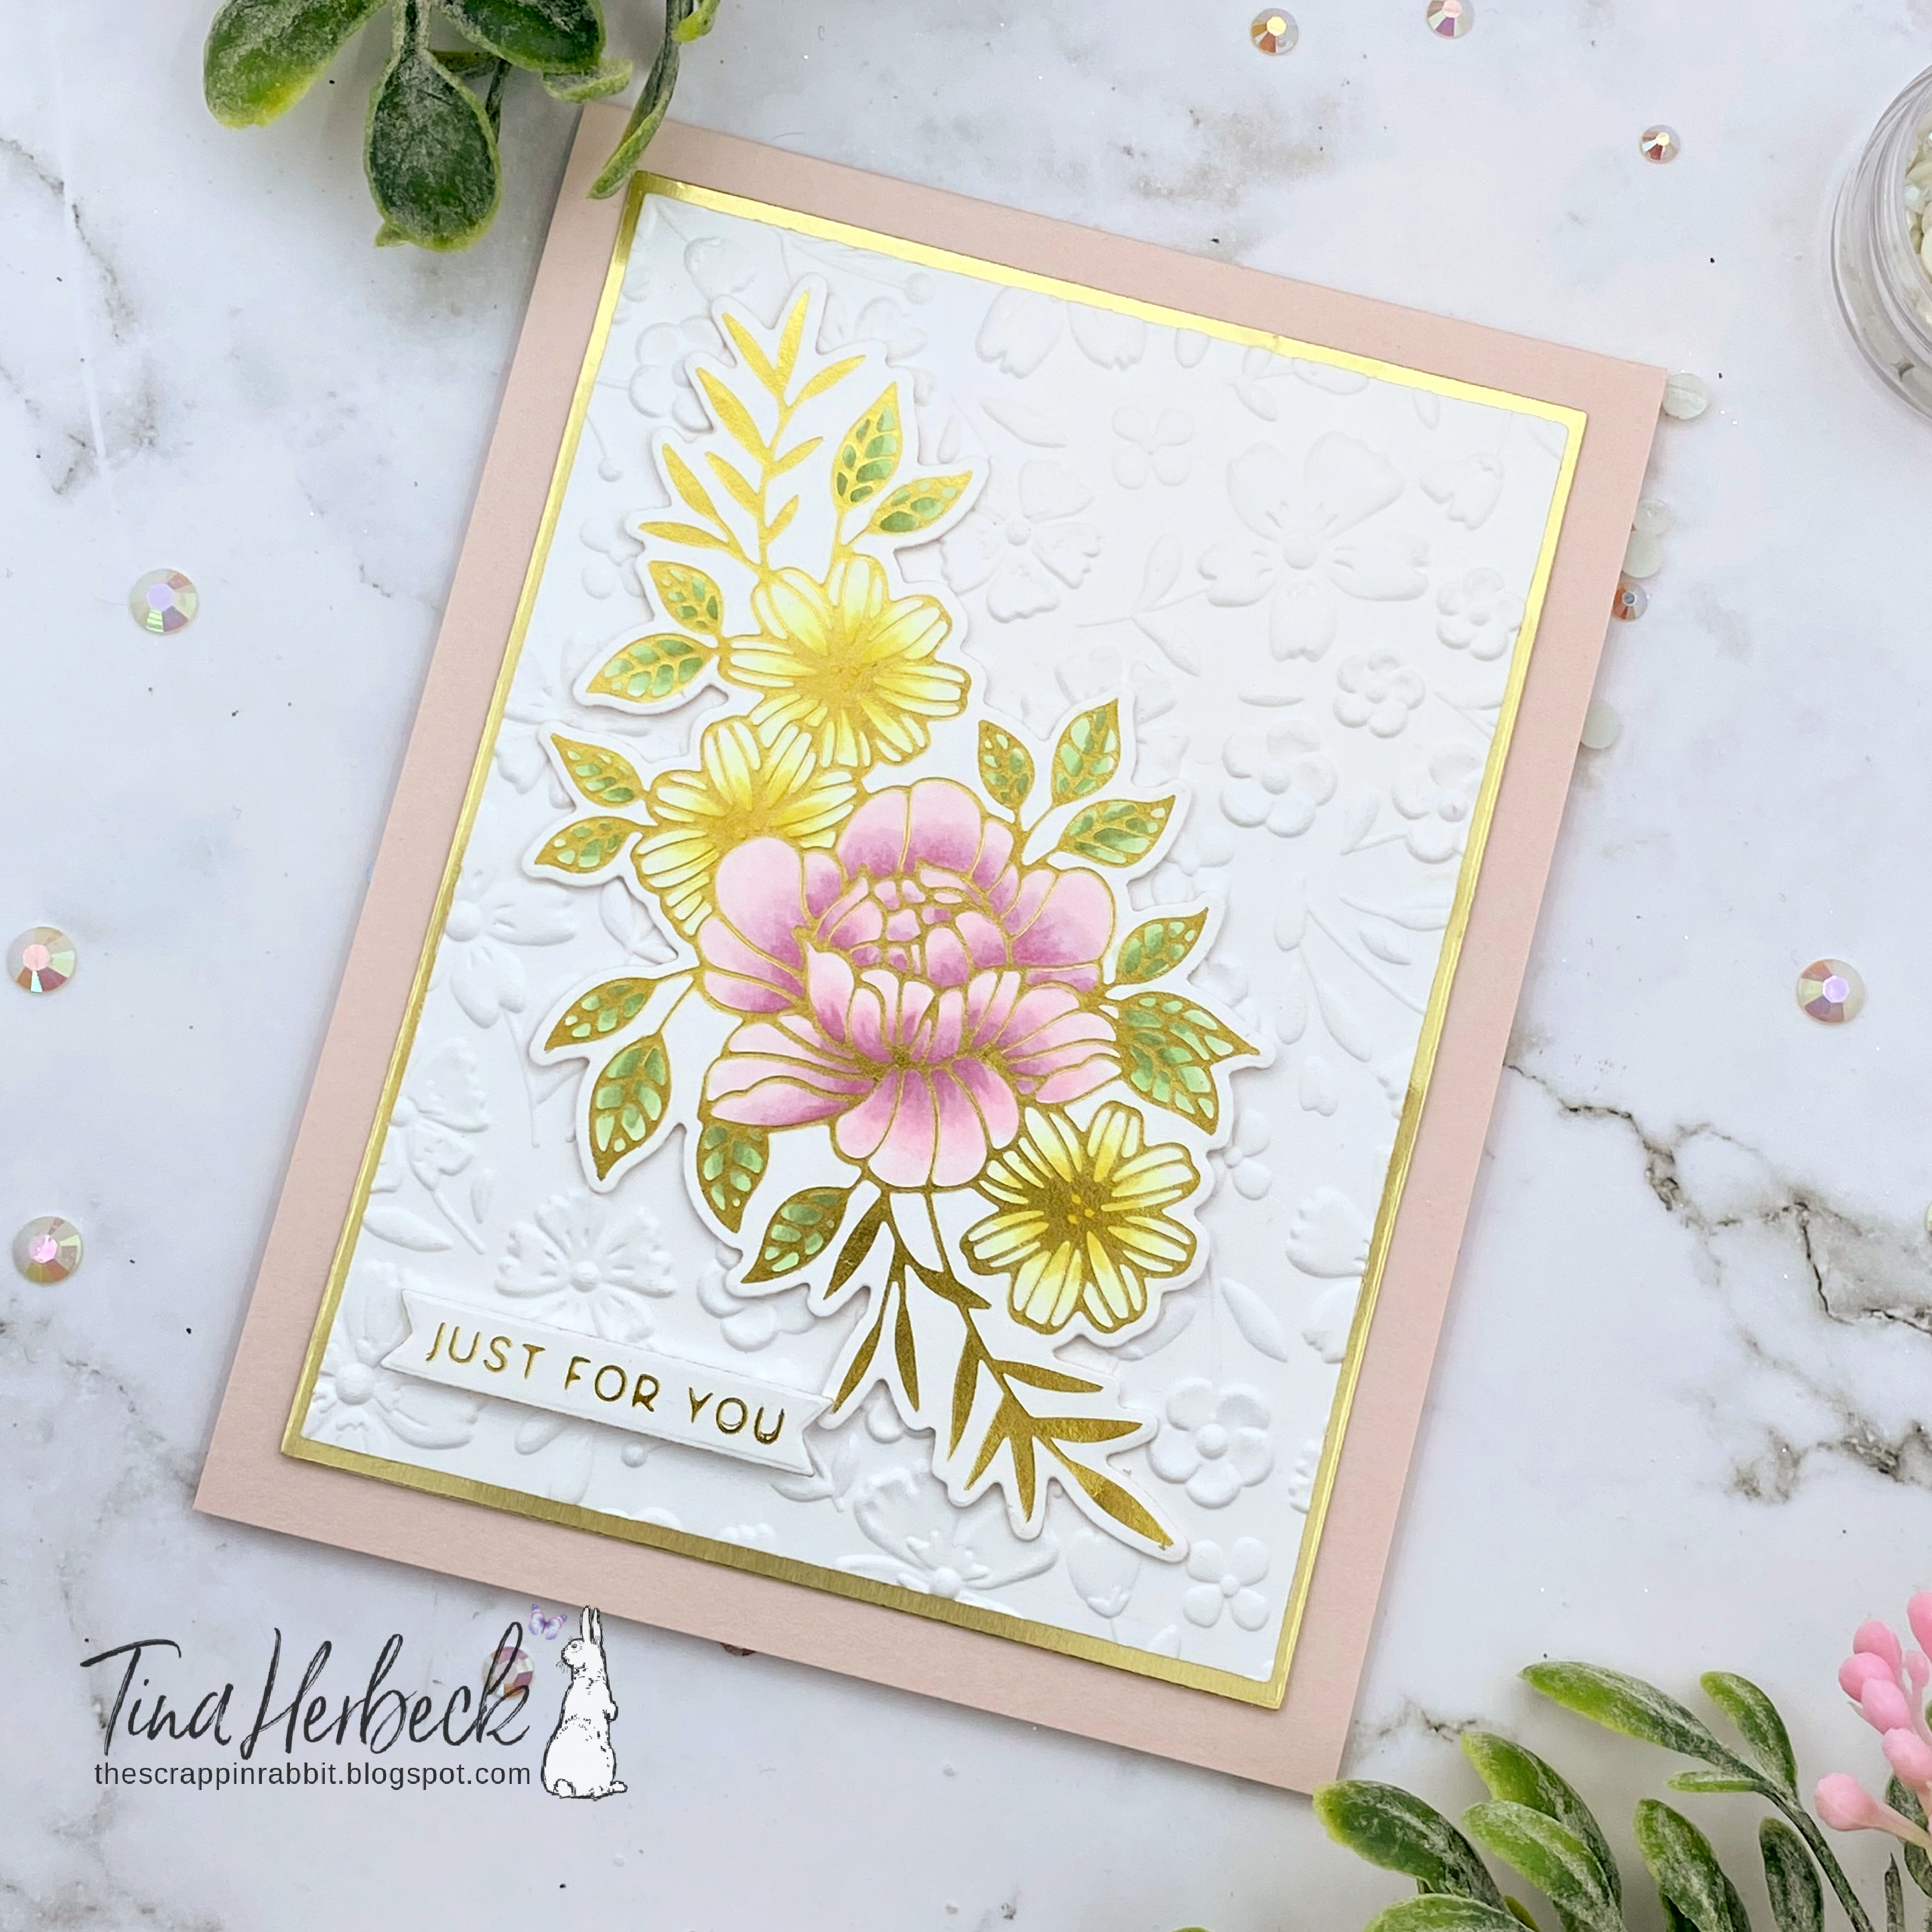
For my second project I used the new Glimmering Just For You Hot Foil Plate and colored it using Copic markers. I cut the floral bouquet using the coordinating die. I cut a rectangle of white card stock and also used the Floral Frenzy 3D embossing folder to add amazing texture. 


I cut out another rectangle using the Gold Mirror card stock to frame the embossed layer and adhered them to the front of a pink A2 card base. I also used the sentiment that came with this set.


Thanks so much for stopping by! I hope you like my cards and will check out the links below. Have a great day :)


Supplies Used:


Friday, October 14, 2022

Spellbinders 3D Vignettes Twin Lens Cameras

Hi crafty friends! I'm so excited to share some projects I created using a new Becca Feeken die from Spellbinders. It is a 3D pop up card/picture holder! It is super easy to make and put together. Here are three different looks for this die set:

I wasn't familiar with a twin lens camera so I googled it to look at some pics. The majority of vintage twin lens cameras I saw were black, gray or silver. This first one I made features realistic and traditional colors. When you put the camera together, it creates four pockets that you can slide the inserts in. I added photos to mine but you can write notes, add stamped images or die cuts. 


You can see on the side that each insert is made to fold flat. I popped up both lens' for added dimension and made this first one without the flower for a more traditional or masculine look.

For the second one I used blues and added the flower. This one I used the word cut out die that says Oh Snap!. I think these inserts are so fun and you can do so much with them! I added a flat back pearl in the center of the flower. 


For the final one, I made it very feminine with soft pinks, creams and golds. I used the silver or gold mirror card stock on all three of my cameras. I cut the flower out of glittered card stock and added a pink gem in the center.

Since these fold flat, you can send them like a card and write messages on the back of the inserts. Or you can journal on them to keep as a memory book.


Thanks so much for stopping by my blog! I posted links of the products I used from Spellbinders below. I hope you like my projects and have a great day :)


Supplies Used:
Pink Essential Gems


Wednesday, July 27, 2022

Spellbinders July 2022 Release More Christmas In July Inspiration

Hello crafty friends!! I have some more cards to share featuring the Spellbinders Christmas in July release! I listed and linked all the products below. I hope you like my cards :)

My first cart features the Balsam and Berries Clear Stamp Set. I stamped and colored the image using Copic markers. I used the Mix & Match Holiday Greetings Die and the Mirror Gold Cardstock for the sentiment. The background features the Stitched Petal Diamond Background Die with no stitching. Even tucked behind it adds a little extra fun to your cards! For a finishing touch I embellished using the Crystal Mix Color Essentials Gems.

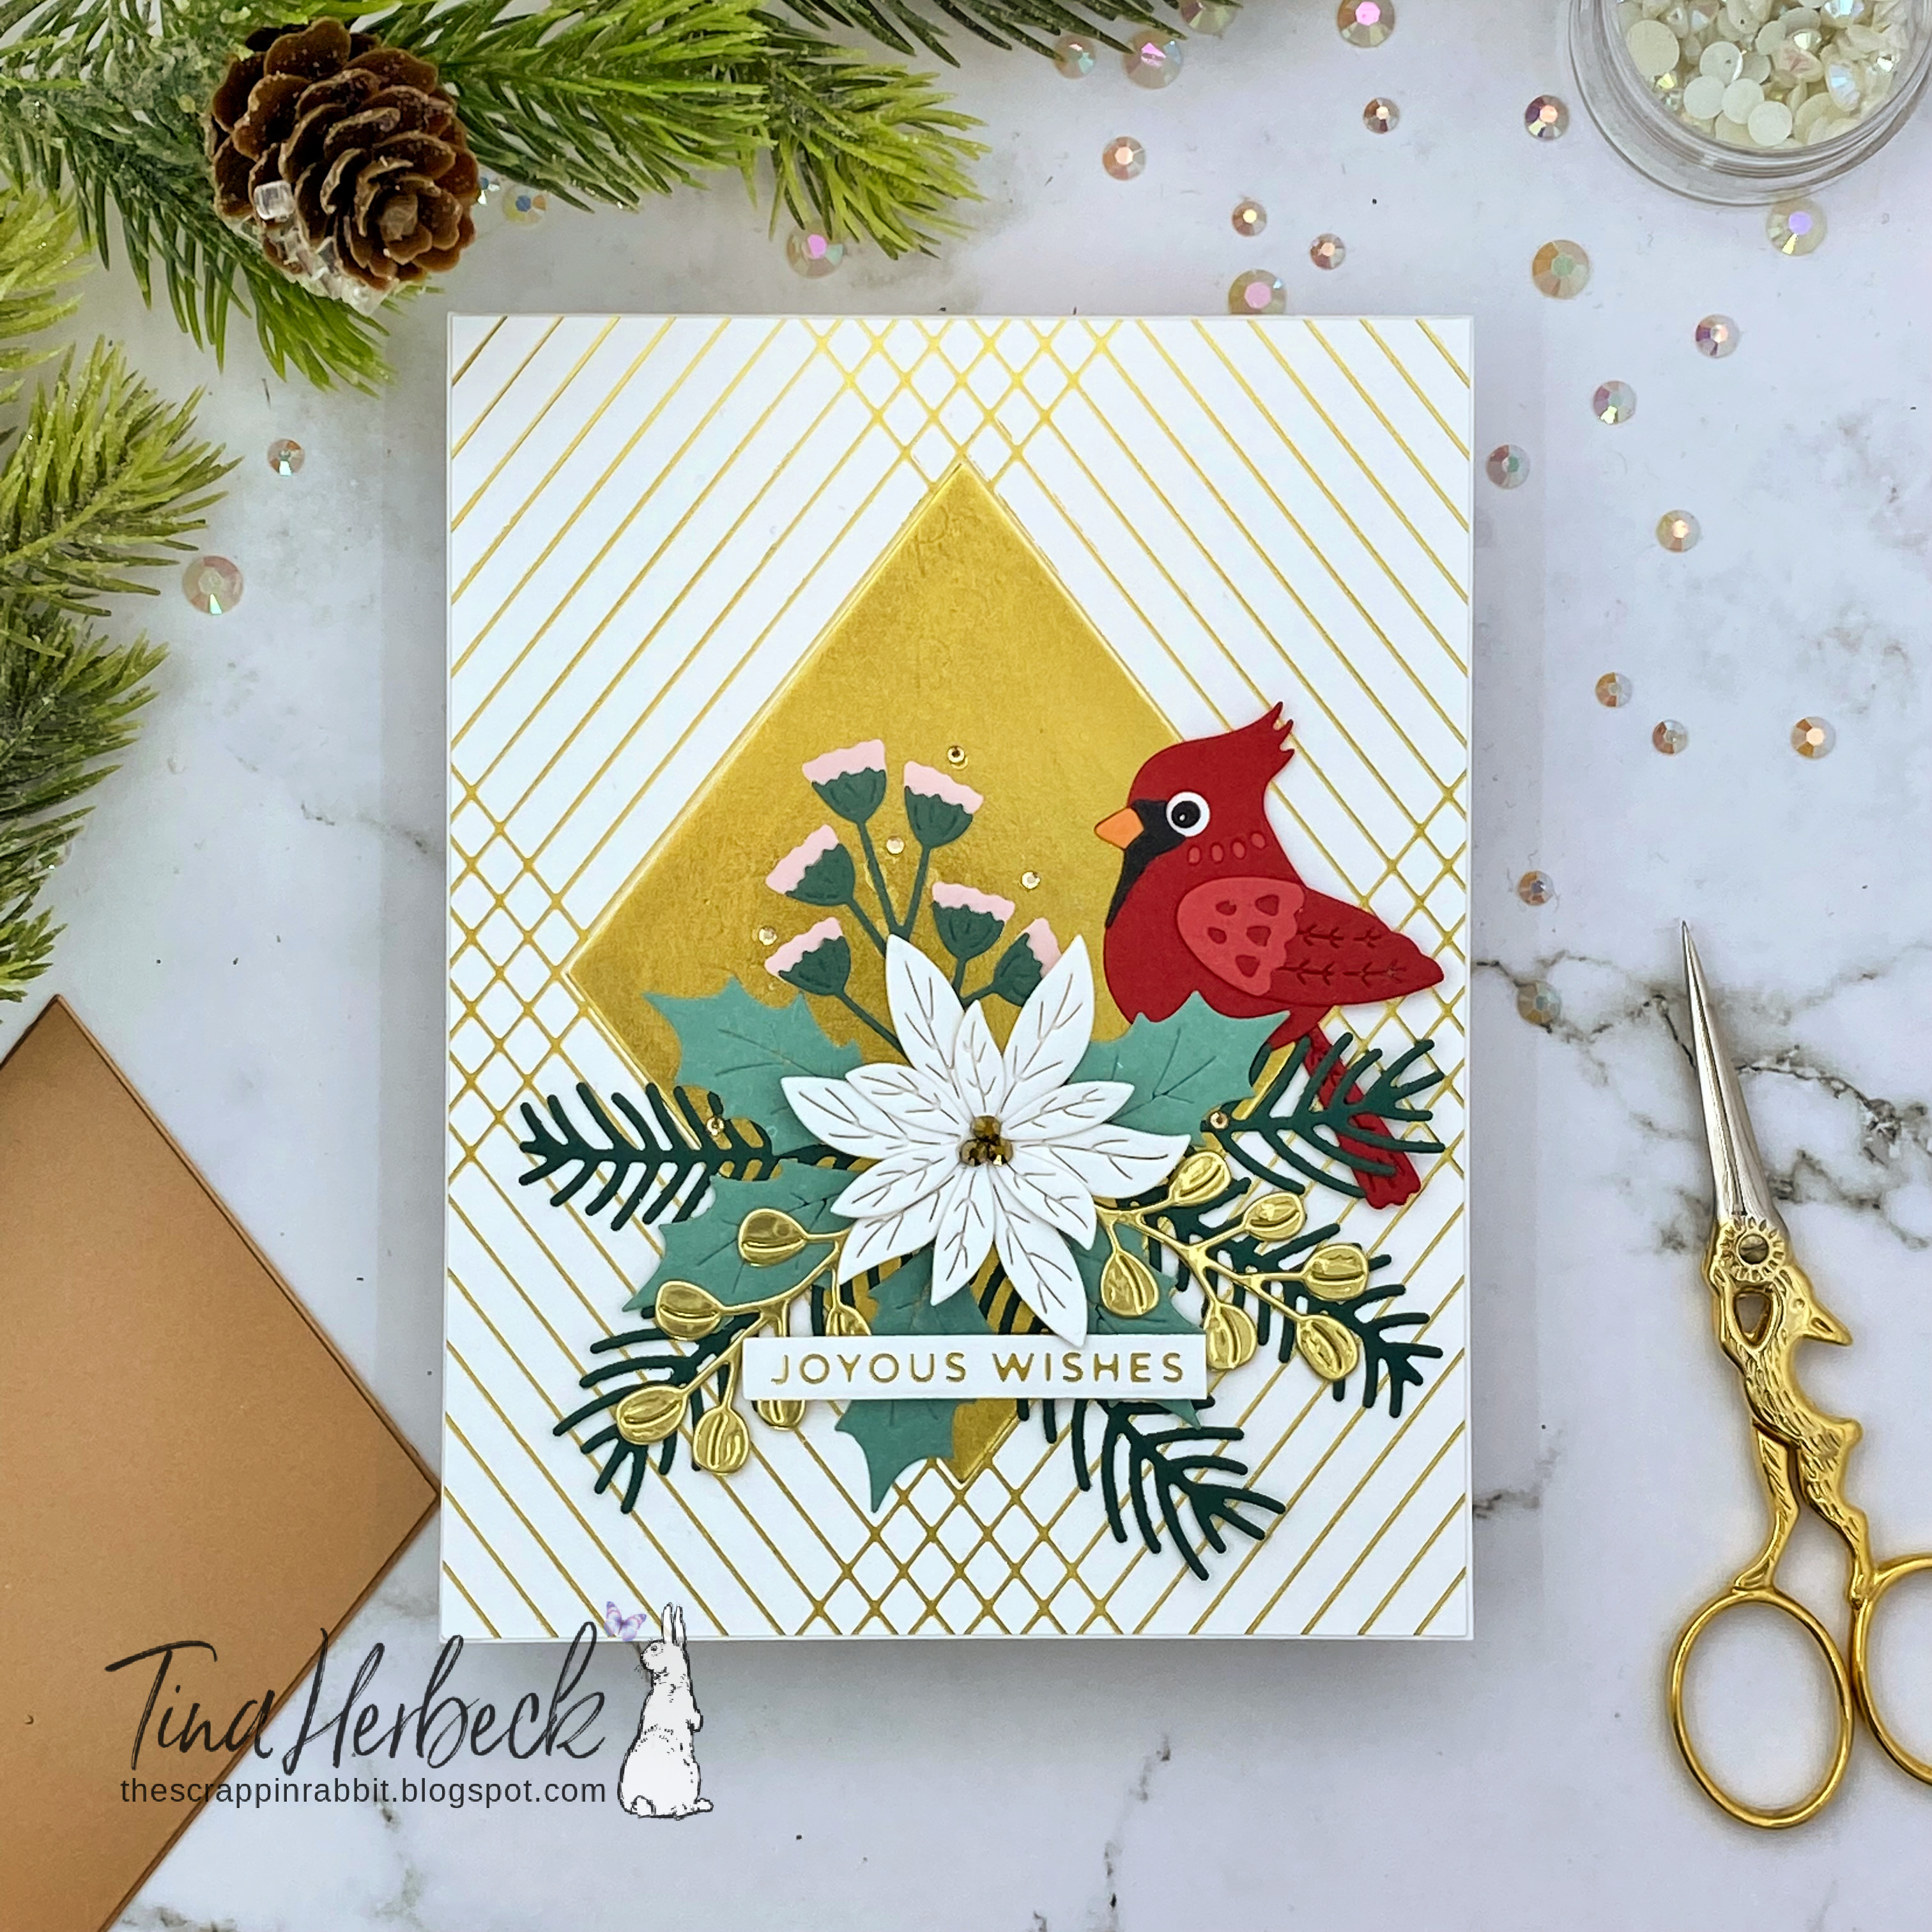
For my second card I used the Glimmer Essential Solid Diamond Hot Foil Plate. It looks so beautiful with the Glimmer Gold Hot Foil. I paired it with the new Crossed Lines Card Front Glimmer Hot Foil Plate and decorated the card using the adorable new Tweet Cardinal Etched Die and Holiday Blooms Dies.

The sentiment is from the new Glitter Wishes Glimmer Hot Foil Plate & Die Set. For a finishing touch I embellished using the Gold Mix Color Essential Gems.


 Thanks so much for stopping by! I hope you have a fabulous day:)

Supplies Used:

Labels

Birthday (5) Birthday Projects (18) Card In A Box (11) Christmas (3) Christmas Projects (57) Coffee theme (2) Craftin Desert Diva's Stamps (157) Easel Card (3) Easter Projects (24) Fall Projects (17) Flip Book (4) Gerda Steiner Designs (2) Get Well Projects (1) Gina Marie Designs (14) Goody Bags (1) Graduation (4) Halloween (2) Halloween projects (30) Happy New Year (1) Harry Potter (4) Hello Bluebird Stamps (1) Hello Kitty (2) Hero Arts (2) Honey Bee Stamps (1) Jaded Blossom (429) Jessica Lynn Original (2) KaDoodle Bug Designs (2) Lawn Fawn (10) Loaded Envelope (1) Lori Whitlock (7) Love Cynthia Stamps (1) Mama Elephant Stamps (5) Masculine Projects (2) Memorydex - Rolodex (2) Mermaids (2) Mini Albums (1) Miss Kate Cuttables (1) Mother's Day (3) My Creative Time Stamps (24) My Favorite Things Stamps (1) My SVG's (5) My Scrap Chick (7) Newtons Nook (101) Planner (14) Pocket Letter (8) Pooh and Friends (5) Pretty Paper Pretty Ribbons (2) Pretty Pink Posh (3) Rilakkuma (1) SVG Cut Club (39) SVG Cuts (2) SVG Cutting Files (85) SVG Made By Me (2) Shaker Cards (28) Shaped Card (1) Sister Stamps (1) Slimline Cards (11) Spellbinders (20) St.Patrick's Day (4) Stamp Anniething (156) Stampendous (1) Star Wars (2) Swap (1) Thank You (1) The Dreaming Tree (1) The Rabbit Hole Designs (4) Tim Holtz (1) Tina's Cute Critter Challenge (2) Valentine's Day Projects (35) Waffle Flower (1) We R Memory Keepers (1) Wedding Projects (2) Winter Projects (4) You Tube Video Tutorial (227) Your Next Stamp (2)