Showing posts with label Pink By Design Stamps. Show all posts

Wednesday, August 17, 2016

Just Bee-cause Bee Card and Tag

Hello friends! I have a card and tag set to share today. I challenged myself to try something new so I went for a distressed/grunge-ish-type of mixed media look. I usually like colorful and cute but these bees were calling me into a different direction....


I made a 5.5"x 5"5 inch square card. I used a couple bees from Jessica Lynn Original stamps that I colored up a while back. It is the digi version of her Big Fat Bee Stamp. I used both Copics (for the black) and Spectrum Noir markers (for the yellows). I added some Wink of Stella to the wings to give them a bit of sparkle.  The paper is from BoBunny and is called Trail Mix Hollow. 


I distressed the edges of the paper and charcoal cardstock layers. I also used Tim Holtz Walnut Stain Distress Ink. The honeycomb is an altered cut I made using my Cricut Artfully Sent cartridge in DS. I inked the around the  edges and then I painted it with the Gansai Tambi Starry Colors Gold. I love that stuff! I bought the palette  a while back and was happy to open it up and give it a try. I felt like it needed something more so I added the black rafia bow. I thought about adding bling but I decided to let the bee and sparkly honeycomb be the focus.


Here is the inside. Both sentiments are from the Pink By Design Honey Pie set. 


The medallion on the front is from Gina Marie Dies and I added metallic gold  Wink of Luna around the edges and distressed it with the walnut stain as well. 


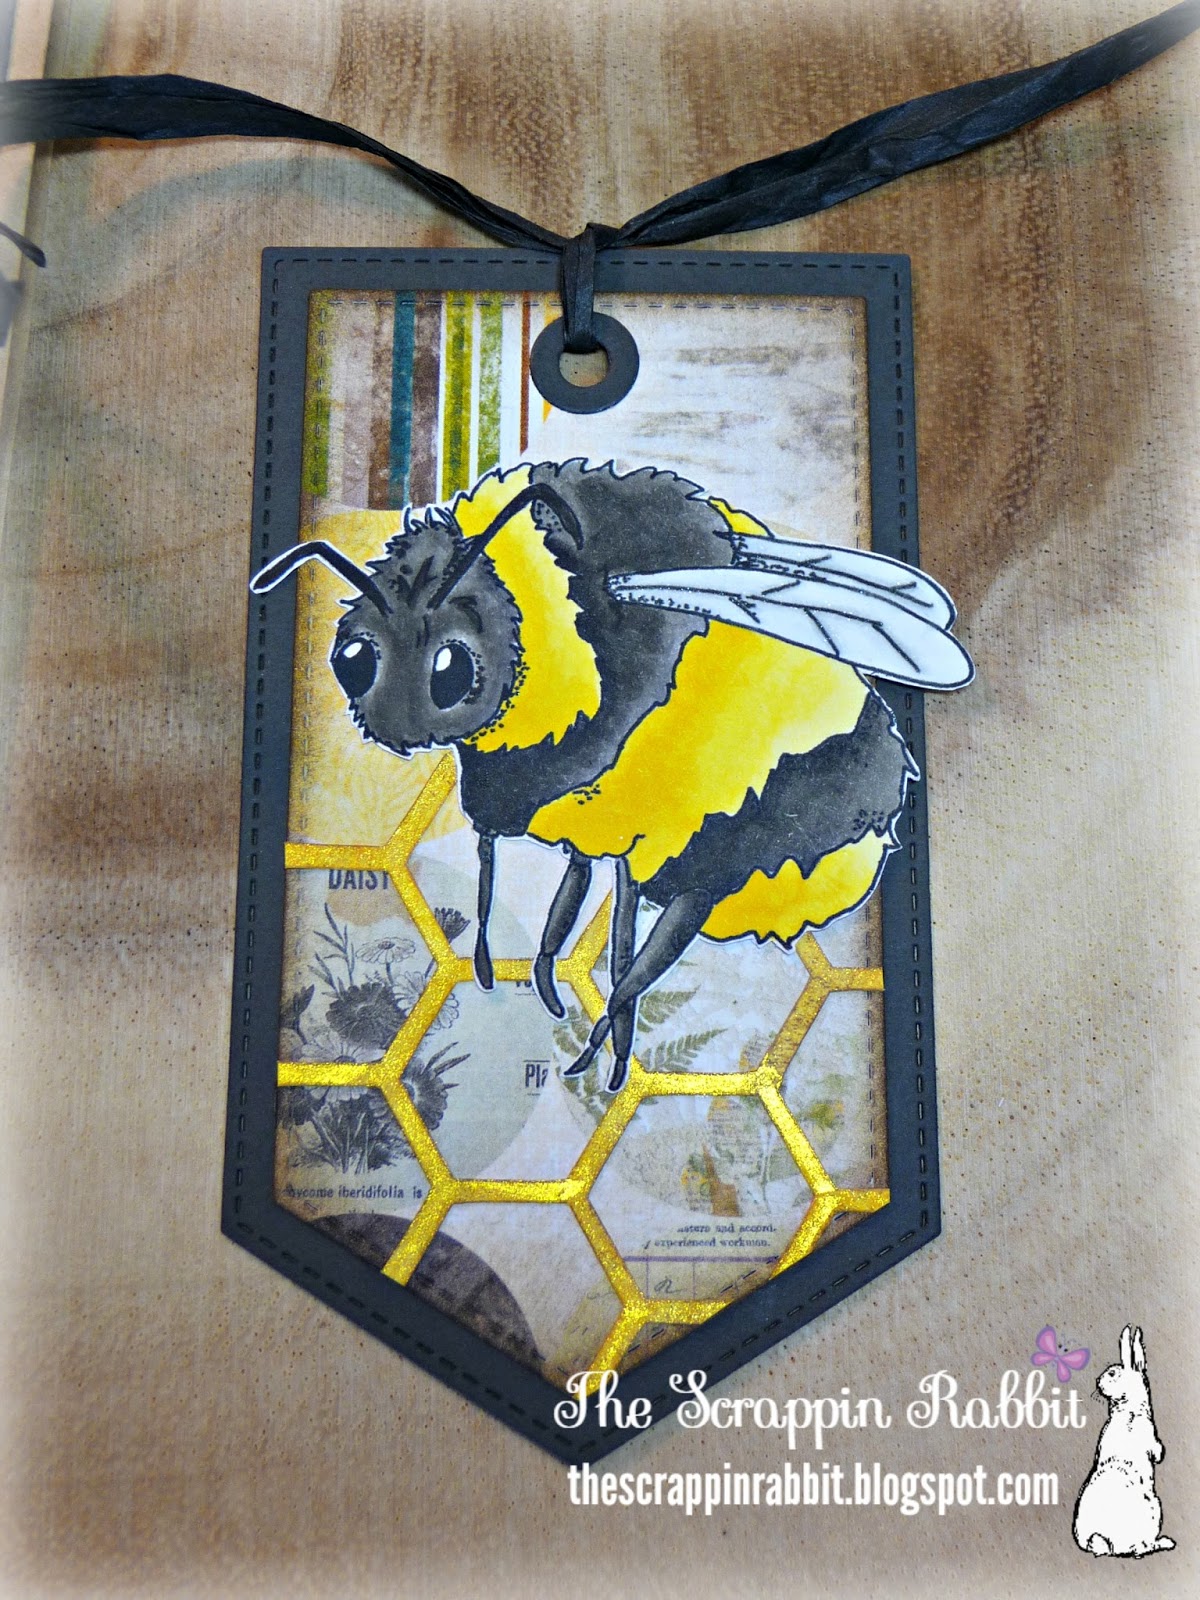
I used the Gina Marie Dropped Pennant dies to make my tag. I decorated it similarly to the card and added a raffia tie. 

Thank you all so much for hoppin' by! 

I will participate in the following challenges:
Crazyhazelnut's Patterned Paper Challenge- Use Patterned Paper
Glitter 'N' Sparkle Challenge- Anything Goes
Word Art Wednesday- Anything Goes
Craft Your Passion Challenges- Challenge 325 Anything Goes

Saturday, August 30, 2014

Apple Of My Eye

Hello there crafty friends! Hope everyone is enjoying what's left of summer. It has been very hot here in SoCal! My kids have just finished their second week of school. This coming week there will be "Back to School Nights" and the week after progress reports.  I want to make some mini cards to give my kids throughout the school year. Here is the first one I made.


This is the apple card from the Wild Card 2 cartridge. I altered it quite a bit. I cut it out at 5.5".  It comes with a branch and bushy leaves attached. I trimmed that off. I cut the envelope out at 4.0" since I trimmed the card. I added another set of glasses and smile to the outer flap too.


Next I changed the frowny face to a smily face. I just love these little glasses. I made this card for my son so no bling! I used a mini tag from My Creative Time Teeny Tag Greetings and stamped it with My Pink Stamper "Fruit and Veggie Puns". I added some twine and stamped the inside with a stamp from Pink By Designs "Our kids" set. 


To me this came out so much cuter than the picture in the book. I hope you like my card! I will participate in the following challenges: 


Thanks for visiting and I hope you have a blessed day!


Wednesday, June 18, 2014

You Did It! 6th Grade promotion card

Hello! I hope this day is a happy one for you so far! Today I have a card I made for my son's 6th Grade Promotion. I can't believe he is going to go to Junior High. Good Bye Elementary!! This is sad for me. He is my baby and is growing up too fast! That is sort of the theme of this card. There are no caps and gowns for a 6th grade ceremony and what came to mind was how the time raced by all too quickly and how he made it past the finish line of grade school. So this is what I put together ...


The race car and driver is a cut from the Beep Beep Cartridge.  It is so cute! I cut him out at 3.0 inches.  I used DCWV blue glitter paper scraps for the car and metallic red paper scraps for the racers outfit and helmet.  I started out with an A2 dark blue, textured, card base 4.25" x 5.5". I bought this cute DCWV mat stack at Joann's for $4 called Dots, Stripes and Plaids. I used paper from this for the layers.  It's hard to see but the colorful paper has texture and glitter. I also inked around with blue ink. 


I added some glossy accents to the front rim and the steering wheel. I doodled with my white pen on the wheels. I added silver Stickles on the stripes of the helmet. I handcut the banner and stamped it with Pink By Design "Our Kids" stamp set. The star brad is from my stash and the clear stars are Miss Elizabeth's crystal gems. I popped up the car and the banner sentiment.


I decorated the inside and stamped with more sentiments from the same set.  I tried not to be too "blingy" or frilly which is hard to do sometimes.  I kept all the lines straight and simple. My son liked it a lot and it made him happy! Here he is with his fake diploma (Lol! They gave everyone a rolled up piece of paper with a ribbon at the ceremony and we picked up his actual diploma in the office afterwards). This little boy has been such a blessing and he fills my heart every day with joy from his kindness and good nature. I'm so very thankful for him!


I hope you enjoyed my card! I will participate in the following challenges: 


Thank you so much for stopping by! Have a blessed day!


Tuesday, May 27, 2014

Happy Birthday to my Drummer Boy!

Hey there my crafty friends! Hope you all enjoyed the long holiday weekend. It was my son's birthday and he just turned 12 years old! YIKES, I'm a mom to a teen and now a tween! My how the time flies. It just reminds me how behind I am on all my scrapbooking. Hopefully I will do more of that this summer. But for now I have this card I want to share. I made this for my son who plays drums. I originally planned to do a box card but I needed something bigger to use a full drum set. So this is what I came up with.


It is a 5.5" x 7.5" Easel Card.  I wanted it to be big so it would feel more special.  I used my baby Cricut for this one. I must admit I was quite frustrated with this card. I love my 3 Cricut machines but my original baby bug cuts so much better than my bigger machines. This frustrates me because I know how well the "other" machine cuts but I have almost two hundred cartridges that I love. I am not taking the dive into the Explore because quite frankly my internet stinks! And we pay top price for the bestest, highest speed gigabytesywhatchamacallits! I'm terrible with the lingo, lol! I cannot depend on the internet for my crafting and it makes me so mad that Provo Craft went that direction and bailed on the stand alone machines. This is why I'm frustrated:


These drum sets are cut at 2.5 inches. The top was cut with my Expression and the bottom cut with my original baby Cricut. I have never been able to get the fine cuts on the Expression machine like I do with my baby. Can you see how the top cut is uneven on the bottom and the swirl cuts are so thin that they look like shreds.  I bought my baby from the original HSN launch in 2006. It cuts perfectly to this day but it is small and not as flexible with the sizes. My Imagine cannot cut like it at all but does wonderful print and cuts. My Expression cuts better than my Imagine but cannot handle the fine cuts like the baby. I know eventually I will upgrade I just haven't wanted to just yet. Anyway, back to my card.


I cut the Drumset from the Quarter Note Cartridge. I used red metallic and black cardstock.  The boy is from the Playtime cartridge. I cut him out at 3".  I used the Peachy Keen Boy Mates stamp set for his face. I chalked his cheeks, added his freckles, and also filled in the eye with a white gel pen  I stamped his shirt with the skull and crossbones to look like the rocker that he is.  The star paper is from the DCWV Rockstar Stack and the Silver is from the DCWV Metallic Stack.  I also added a layer of the red shimmer paper.  The music note brads I've had forever and I handcut the banners. 


The inside layer cutouts are from Elegant Edges, my regular "go to" Cartridge.  I used Pink By Design and Joys life Stamps for the sentiments.  I also added the Elizabeth Crafts black glitter dots on both sides. The boy is actually sitting on a stool but you can't see it. I popped up the drumset and the sentiments. The card is really heavy and really shimmers and glimmers but in a "Rockstar" non-girly way. I know the pics don't really show that.


I love the little boy.  He is so cute! Just like my Timothy. I hope you liked my card! I'm going to participate in the following challenges:


Thanks so much for hopping in and I wish you a happy day!


Labels

Birthday (5) Birthday Projects (18) Card In A Box (11) Christmas (3) Christmas Projects (57) Coffee theme (2) Craftin Desert Diva's Stamps (157) Easel Card (3) Easter Projects (24) Fall Projects (17) Flip Book (4) Gerda Steiner Designs (2) Get Well Projects (1) Gina Marie Designs (14) Goody Bags (1) Graduation (4) Halloween (2) Halloween projects (30) Happy New Year (1) Harry Potter (4) Hello Bluebird Stamps (1) Hello Kitty (2) Hero Arts (2) Honey Bee Stamps (1) Jaded Blossom (429) Jessica Lynn Original (2) KaDoodle Bug Designs (2) Lawn Fawn (10) Loaded Envelope (1) Lori Whitlock (7) Love Cynthia Stamps (1) Mama Elephant Stamps (5) Masculine Projects (2) Memorydex - Rolodex (2) Mermaids (2) Mini Albums (1) Miss Kate Cuttables (1) Mother's Day (3) My Creative Time Stamps (24) My Favorite Things Stamps (1) My SVG's (5) My Scrap Chick (7) Newtons Nook (101) Planner (14) Pocket Letter (8) Pooh and Friends (5) Pretty Paper Pretty Ribbons (2) Pretty Pink Posh (3) Rilakkuma (1) SVG Cut Club (39) SVG Cuts (2) SVG Cutting Files (85) SVG Made By Me (2) Shaker Cards (28) Shaped Card (1) Sister Stamps (1) Slimline Cards (11) Spellbinders (20) St.Patrick's Day (4) Stamp Anniething (156) Stampendous (1) Star Wars (2) Swap (1) Thank You (1) The Dreaming Tree (1) The Rabbit Hole Designs (4) Tim Holtz (1) Tina's Cute Critter Challenge (2) Valentine's Day Projects (35) Waffle Flower (1) We R Memory Keepers (1) Wedding Projects (2) Winter Projects (4) You Tube Video Tutorial (227) Your Next Stamp (2)