Thursday, May 18, 2023

Newton's Nook Designs May Release Day 4

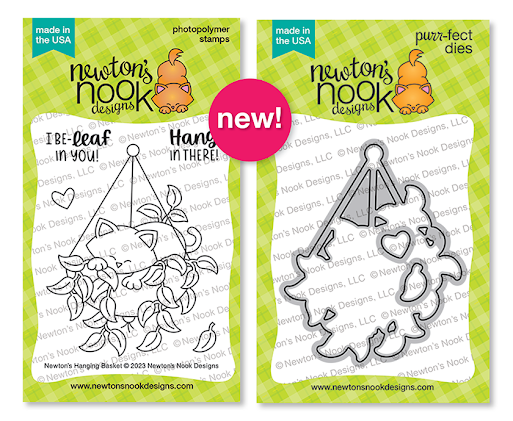
Hi crafty friends! It is Day 4 and the last day of reveals for the Newton's Nook Designs May release! Today we are featuring a new stamp set with coordinating die: Newton's Hanging Basket Stamps and Die Set.

Here is what I created:


I kept this design simple because newton is really the star of this card! First I stamped the images, colored them using Copic markers and cut them out using the coordinating die. I love how the die allows the spaces between the hanging plant cord to show through! Next I die cut a white layer of cardstock using the Frameworks Die. I lightly ink blended the background using some light teal ink and stamped and embossed the sentiment. 


I adhered the layer onto an A2 top folding card base and glued Newton and the falling leaves onto the layer. For a finishing touch I added some sparkly bling.

Here is a closer look at this adorable new set:

 Would you like to win the “Newton’s Hanging Basket” Stamp Set? This stamp set will be given away to ONE lucky winner!

Here's how to win: Comment on the NND blog and Design Team blogs (see list below)! The winner will be chosen at random from the collective reveal posts. Make sure to check out each of their blogs and comment for your chance to win. You will not know which blog has been chosen so the more you comment on the better your chances are of winning! You have until Thursday May 18th at 9pm ET to comment  -- winners will be announced on the blog post on Friday, May 19th. 

Check out all the awesome Design Team Blogs below to enter:

Newton's Nook Designs

Donna Idlet

Ellen Haxelmans

                         Tina Herbeck (You are HERE)
Larissa Heskett

Samantha Mann

Zsofia Molnar

Maria Russell

Tatiana Trafimovich

Amanda Wilcox

Thanks so much for stopping by! Have a blessed day :)

Wednesday, May 17, 2023

Newton's Nook Designs May Release Day 3

Hi crafty friends! It is Day 3 of the Newton's Nook Designs May release and we are featuring a new stencil as well as a stamp set with coordinating die: Birdhouse Greetings Stamps and Dies and the Birdhouse Line Stencil.

Here is what I created:


I created a little birdhouse scene. First I stamped and colored the adorable image using Copic markers and cut it out using the coordinating dies. To create the background, I cut out a scalloped layer using the Frames & Flags Die and inked the sky using the Clouds Stencil. Directly below the clouds I stenciled the birdhouses using colored inks for the different layers on the stencil. Next I cut out another scalloped layer and trimmed it using the Land Borders Die to create the grass.

I stamped the sentiment and added a shimmery silver splatter to the sky and gold and green splatter to the grass. 

Here is a closer look at the new products I used:

Would you like to win the “Birdhouse Greetings” Stamp Set? This stamp set will be given away to ONE lucky winner!

Here's how to win: Comment on the NND blog and Design Team blogs (see list below)! The winner will be chosen at random from the collective reveal posts. Make sure to check out each of their blogs and comment for your chance to win. You will not know which blog has been chosen so the more you comment on the better your chances are of winning! You have until Thursday May 18th at 9pm ET to comment  -- winners will be announced on the blog post on Friday, May 19th. 

Check out all the awesome Design Team Blogs below to enter:

Newton's Nook Designs

Donna Idlet

Ellen Haxelmans

                            Tina Herbeck (You are HERE)

Larissa Heskett

Samantha Mann

Zsofia Molnar

Maria Russell

Tatiana Trafimovich

Amanda Wilcox

Thanks so much for stopping by! Have a blessed day :)

Tuesday, May 16, 2023

Newton's Nook Designs May Release Day 2


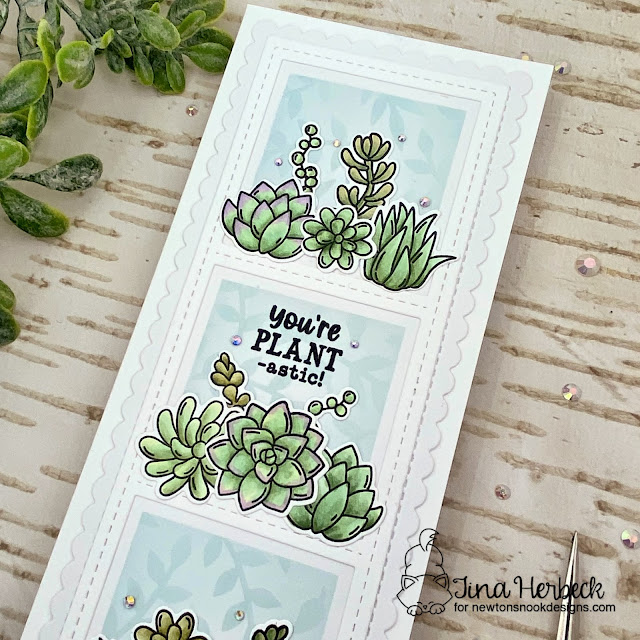
Hi crafty friends! It is Day 2 of the Newton's Nook Designs May release and we are featuring a new stencil as well as a stamp set with coordinating die: Succulent Gardens and Trailing Leaves Stencil. The new release will be available on Friday!
Here is what I created:

I decided to make a slimline card to feature all the lovely succulents in the new stamp set. First I stamped and colored all the images using Copic markers and cut them out using the coordinating die set. To create the windows I used the Slimline Masking Squares Stencil along with the new Trailing Leaves Stencil along with some light blue ink. 

I framed the squares using the layer from the Slimline Frames & Windows Die Set and added an additional scalloped layer from the Slimline Frames & Portholes Die Set. I chose to do white on white to make the images really pop. I stamped and embossed the sentiment onto the center square and for a finishing touch I added some sparkly bling. 

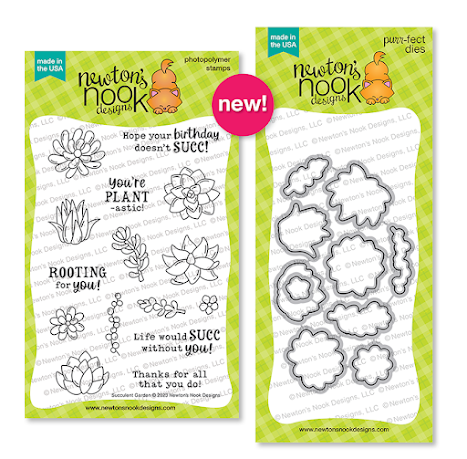
Here is a closer look at the new products I used:


 Would you like to win the “Succulent Garden” Stamp Set ? This stamp set will be given away to ONE lucky winner!

Here's how to win: Comment on the NND blog and Design Team blogs (see list below)! The winner will be chosen at random from the collective reveal posts. Make sure to check out each of their blogs and comment for your chance to win. You will not know which blog has been chosen so the more you comment on the better your chances are of winning! You have until Thursday May 18th at 9pm ET to comment  -- winners will be announced on the blog post on Friday, May 19th. 

Check out all the awesome Design Team Blogs below to enter:

Newton's Nook Designs

Donna Idlet

Ellen Haxelmans

                            Tina Herbeck  (You are HERE)

Larissa Heskett

Samantha Mann

Zsofia Molnar

Maria Russell

Tatiana Trafimovich

Amanda Wilcox

Thanks so much for stopping by! Have a blessed day!

Monday, May 15, 2023

Newton's Nook Designs May Release Day 1

Hi crafty friends! It is time for another fabulous release from Newton's Nook Designs and today is Day 1 of the reveals! We are sharing projects made using the NEW hot foil plates and dies! I'm super excited about these and love hot foiling on my cards! The release will be available in the shop on Friday, May, 19th.
 Here is what I created:

I used the new Jar Hot Foil Plate along with the Fireflies Hot Foil Plates and tried to make a glowy card. Both sets come with coordinating dies but I hot foiled directly onto the card stock. I also used the new Bright Sentiments Hot Foil Plate across the top of the card layer. I wanted to keep the design simple to really have the foiled images pop. I hot foiled with silver foil for the jar and sentiment and gold foil for the fireflies.

Next I ink blended the background from dark to light around the edges and added yellow around the fireflies for the glow effect. I added sparkle to the wings and for a finishing touch added a few sparkly gems. 

Here is a closer look at the new hot foiled products that are featured for today's reveal:


Would you like to win the “Fireflies” Hot Foil Plates & Dies? This hot foiling  set will be given away to ONE lucky winner!

Here's how to win: Comment on the NND blog and Design Team blogs (see list below)! The winner will be chosen at random from the collective reveal posts. Make sure to check out each of their blogs and comment for your chance to win. You will not know which blog has been chosen so the more you comment on the better your chances are of winning! You have until Thursday May 18th at 9pm ET to comment  -- winners will be announced on the blog post on Friday, May 19th. 

Check out all the awesome Design Team Blogs below to enter:

Newton's Nook Designs

Donna Idlet

Ellen Haxelmans

                        Tina Herbeck (You are HERE)

Larissa Heskett

Samantha Mann

Zsofia Molnar

Maria Russell

Tatiana Trafimovich

Amanda Wilcox

Thanks so much for stopping by! Have a great day :)

Monday, May 8, 2023

Spellbinders Cards Stylish Ovals Collection

Hello crafty friends! I have some cards to share that I created using Spellbinders' April release Stylish Ovals Collections. I absolutely LOVE this new product and I hope you will check them out. All the supplies I used are listed and linked below :)

This first couple cards both feature the gorgeous new Stylish Oval Floral Bird Glimmer Hot Foil Plate. This might be my most favorite hot foil plate yet! 

I hot foiled the bird design using the Gold Foil onto an A2 layer of white card stock. I colored up the image using Copic markers. To frame the image I used the Infinity Punch & Pierce Plate Etched Dies. This die has so many layers and I just used the outermost die cut for my cards. For a finishing touch I added some bling from the Gold Mix Color Essentials Gems.


For my second card I hot foiled the bird onto pink card stock using Spellbinder's pink hot foil. I colored the image with just pinks and greens and cut it out using the new Essential Stylish Ovals Etched Dies. I love this oval die set because it is so unique and I hope to use it again on upcoming projects. I added a foiled and die cut sentiment from Yana's Sentiments Glimmer Hot Foil Plate & Die Set.


Next I added a layer of white card stock to frame the image and adhered it over the Infinity Punch & Pierce Plate frame that I cut using a darker shade of pink card stock. I added double sided adhesive foam tape to pop it up and add some dimension. For a finishing touch, I added bling from the Pink Color Essential Gems. I adhered the panel onto a white A2 sized top folding card base so the white would peek through the cutouts.


For my last card, I used the new Stitched Floral Flip Frame Etched Dies. I cut the florals out in a variety of pastel colored card stock and sent them through again using the embossing pad to get the etched lines. It is difficult to see the lines in the photo. This die is a stitching die but as you can see, you can use it as a decorative die. I do love to do the stitching but sometimes you may not have the time. This die cuts out the little holes and adds the lines. 


I inked around the edges of the die cuts to add a bit of dimension. The die cuts out in two parts and I doubled up to add the top and bottom creating the perfect frame for a sentiment. I used the Yana's Special Sentiments Glimmer Hot Foil Plates & Die and directly foiled it onto the center of a white card stock layer. For a finishing touch I added bling from both the Gold Mix and Pink Essential Gems.


Thanks so much for stopping by today! I hope you like my cards and will check out the supllies I listed below. Have a great day :)

Supplies Used:


Labels

Birthday (5) Birthday Projects (18) Card In A Box (11) Christmas (3) Christmas Projects (57) Coffee theme (2) Craftin Desert Diva's Stamps (157) Easel Card (3) Easter Projects (24) Fall Projects (17) Flip Book (4) Gerda Steiner Designs (2) Get Well Projects (1) Gina Marie Designs (14) Goody Bags (1) Graduation (4) Halloween (2) Halloween projects (30) Happy New Year (1) Harry Potter (4) Hello Bluebird Stamps (1) Hello Kitty (2) Hero Arts (2) Honey Bee Stamps (1) Jaded Blossom (429) Jessica Lynn Original (2) KaDoodle Bug Designs (2) Lawn Fawn (10) Loaded Envelope (1) Lori Whitlock (7) Love Cynthia Stamps (1) Mama Elephant Stamps (5) Masculine Projects (2) Memorydex - Rolodex (2) Mermaids (2) Mini Albums (1) Miss Kate Cuttables (1) Mother's Day (3) My Creative Time Stamps (24) My Favorite Things Stamps (1) My Scrap Chick (7) My SVG's (5) Newtons Nook (101) Planner (14) Pocket Letter (8) Pooh and Friends (5) Pretty Paper Pretty Ribbons (2) Pretty Pink Posh (3) Rilakkuma (1) Shaker Cards (28) Shaped Card (1) Sister Stamps (1) Slimline Cards (11) Spellbinders (20) St.Patrick's Day (4) Stamp Anniething (156) Stampendous (1) Star Wars (2) SVG Cut Club (39) SVG Cuts (2) SVG Cutting Files (85) SVG Made By Me (2) Swap (1) Thank You (1) The Dreaming Tree (1) The Rabbit Hole Designs (4) Tim Holtz (1) Tina's Cute Critter Challenge (2) Valentine's Day Projects (35) Waffle Flower (1) We R Memory Keepers (1) Wedding Projects (2) Winter Projects (4) You Tube Video Tutorial (227) Your Next Stamp (2)