Friday, October 14, 2022

Spellbinders 3D Vignettes Twin Lens Cameras

Hi crafty friends! I'm so excited to share some projects I created using a new Becca Feeken die from Spellbinders. It is a 3D pop up card/picture holder! It is super easy to make and put together. Here are three different looks for this die set:

I wasn't familiar with a twin lens camera so I googled it to look at some pics. The majority of vintage twin lens cameras I saw were black, gray or silver. This first one I made features realistic and traditional colors. When you put the camera together, it creates four pockets that you can slide the inserts in. I added photos to mine but you can write notes, add stamped images or die cuts. 


You can see on the side that each insert is made to fold flat. I popped up both lens' for added dimension and made this first one without the flower for a more traditional or masculine look.

For the second one I used blues and added the flower. This one I used the word cut out die that says Oh Snap!. I think these inserts are so fun and you can do so much with them! I added a flat back pearl in the center of the flower. 


For the final one, I made it very feminine with soft pinks, creams and golds. I used the silver or gold mirror card stock on all three of my cameras. I cut the flower out of glittered card stock and added a pink gem in the center.

Since these fold flat, you can send them like a card and write messages on the back of the inserts. Or you can journal on them to keep as a memory book.


Thanks so much for stopping by my blog! I posted links of the products I used from Spellbinders below. I hope you like my projects and have a great day :)


Supplies Used:
Pink Essential Gems


Thursday, October 13, 2022

Newon's Nook Designs Holiday Release Day 4


Hi crafty friends! Today is the Day 4 and the last day of reveals for the Newton's Nook Designs Holiday Release and we are sharing one last stamp set. Here is what I created:


I stamped and embossed the new Snowflake Oval stamp set with sparkly silver embossing powder and cut it out using the Oval Frames Die. I stamped and colored the adorable image from the new Holiday Heights and cut it out using the coordinating die. 


I cut out a rectangle out of some light blue card stock and added texture paste with the Petite Snow Stencil. I popped up the snowman and puppy using double sided adhesive foam tape and for a finishing touch added some teal sparkly gems.


Copic Colors
Dog- E27, E25, E23, E42, E41
Hat- T7, T5, T3, T1, Y28, Y26, YR24, Y11, Y00
Nose- YR18, YR15, YT12, Y21
Snowman- C0, B0000, C00

Would you like to win the “Snowflake Oval” Stamp Set? This stamp set will be given away to ONE lucky winner!

Here's how to win: Comment on the NND blog and Design Team blogs (see list below)! The winner will be chosen at random from the collective reveal posts. Make sure to check out each of their blogs and comment for your chance to win. You will not know which blog has been chosen so the more you comment on the better your chances are of winning! You have until Thursday October 13th at 9pm ET to comment  -- winners will be announced on the blog post on Friday October 14th. 


Thank you so much for stopping by! Have a great day :)

Wednesday, October 12, 2022

Newton's Nook Designs Holiday Release Day 3


Hi crafty friends! It is Day 3 of the Newton's Nook Designs Holiday Release and today we have two new stamps and coordinating dies to reveal. Here is what I created:


My first card features the adorable new Christmas Naps and coordinating dies which include the words. I stamped and colored the image using Copic markers. Then I ink blended a simple background glued the image down. I cut the words out twice with white and gold cardstock and glued them together. and onto the front of my card. So easy, clean and simple!


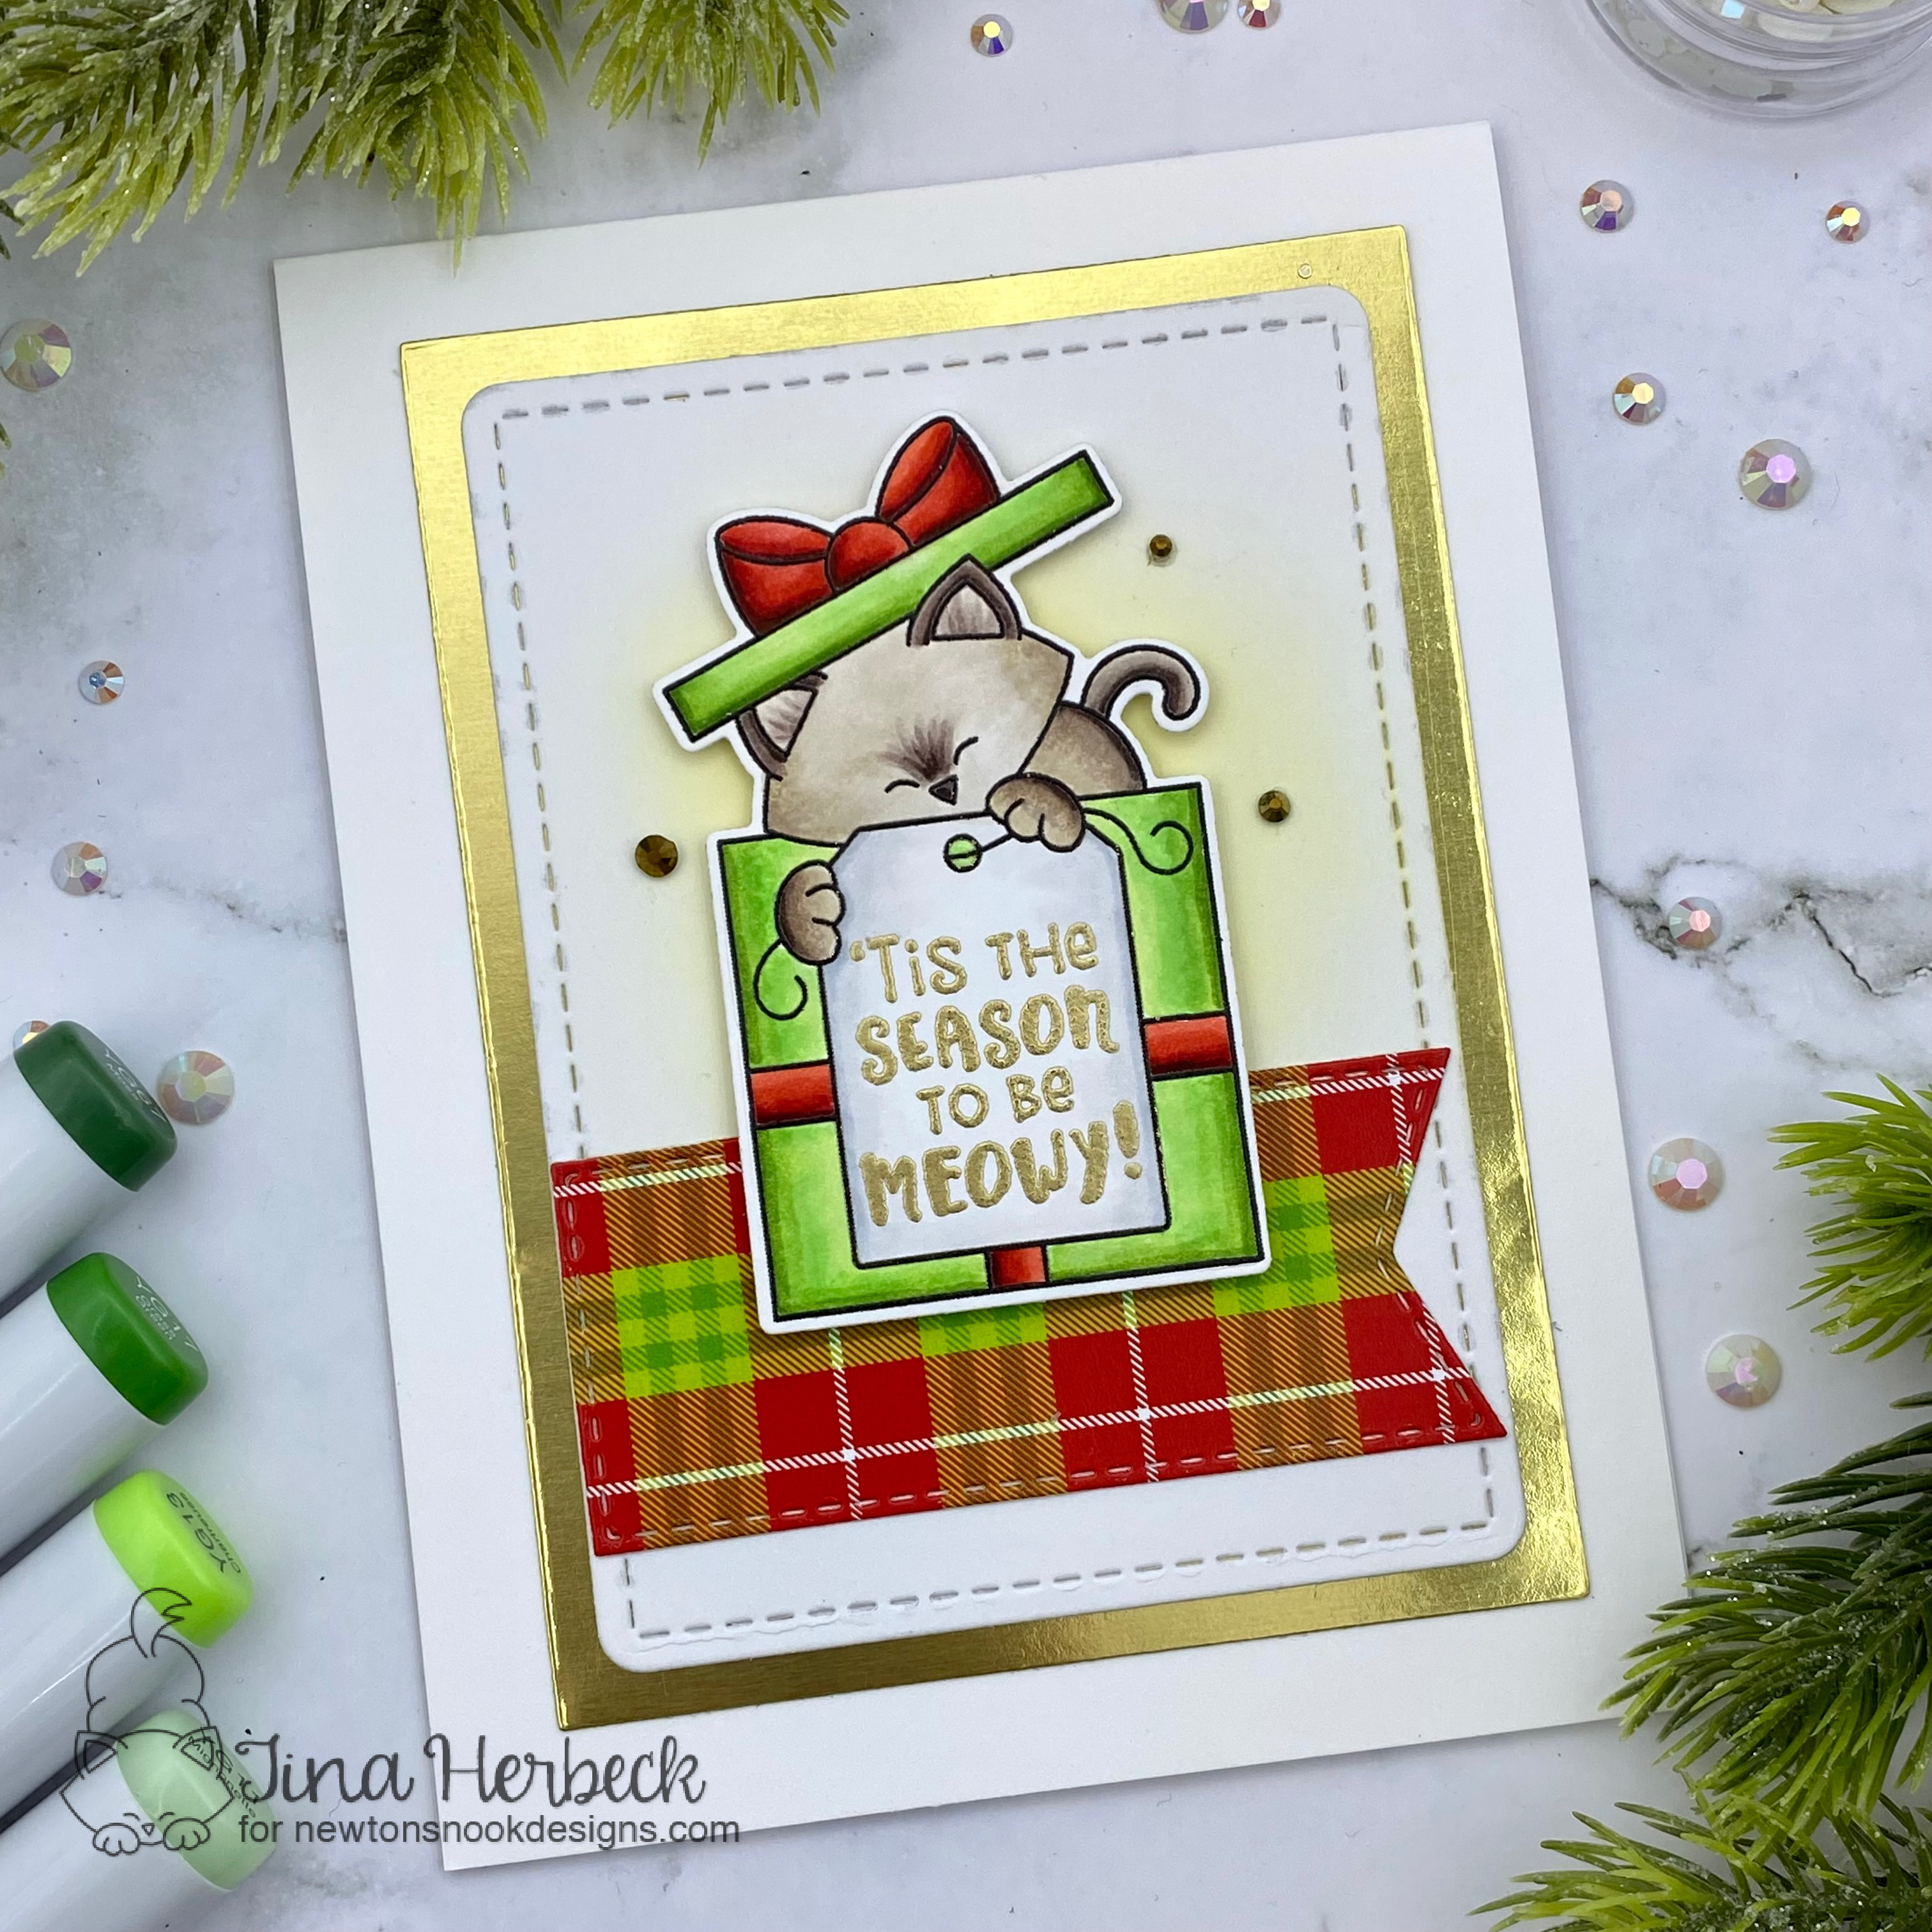
My second card features the oh so cute Newton's Gift Stamp and coordinating die. I colored up the kitty using Copic markers. I also stamped and embossed the sentiment on the tag using gold embossing powder. 

Copic Colors
Chair- BG72, BG000, BG70, E42, E41, E40
Tree, ornaments and presents- YG67, YG17, YG13, YG11, BG15, BG13, BG11, Y28, Y26, Y13, Y11, R27, R24, R22, C2, C0, C00
Dog- E44, E43, E42, E41, E40, T7, T5, T3
Cat- T3, T1, T0, C00


I used the stitched banner from the Bookmark Dies to cut out the plaid pattern from the new Christmas Time Paper. I cut out the rectangle from the Frames & Flags Dies and lightly ink blended with yellow ink to give it a glow.


I added a rectangle cut from gold mirror card stock and for a finishing touch added some gold gemstones.


Copic Colors
Cat- E79, E74, E70, E41, E40
Present- YG17, YG13, YG11, R59, R27, R24, R22 

Would you like to win the “Christmas Nap” or the “Newton’s Gift” Stamp Set? We will choose ONE lucky winner for each stamp set!

Here's how to win: Comment on the NND blog and Design Team blogs (see list below)! The winner will be chosen at random from the collective reveal posts. Make sure to check out each of their blogs and comment for your chance to win. You will not know which blog has been chosen so the more you comment on the better your chances are of winning! You have until Thursday October 13th at 9pm ET to comment  -- winners will be announced on the blog post on Friday October 14th. 


Thanks so much for stopping by! Have a great day :)

Tuesday, October 11, 2022

Newton's Nook Designs Holiday Release Day 2


Hi crafty friends! It is Day 2 of the Newton's Nook Holiday Release and today we have two new stamps with coordinating dies to reveal. Here is what I created:


My first card features the new Holiday Haul Stamps and dies. I stamped and colored the truck image using Copic markers and cut it out using the coordinating dies. I cut out rectangular strips from the new Christmas Time Paper Pad and a thin strip of silver foil card stock.


I cut out a circle from the Circle Frames Die Set and stamped and embossed the sentiment from the Heartfelt Holidays Stamps. I lightly ink blended blue ink for the background, popped up the truck and embellished with some sparkly snowflakes.


For my second card I colored the pups with Copic markers and cut the image out using the coordinating dies. I cut a rectangle from the new Canine Christmas Paper Pad for the background.


I cut out the stitched circle using the Circle Frames Die and lightly blended some yellow ink. I stamped and embossed the sentiment on the banner from the Banner Trio Die set. For a finishing touch I added some sparkle to the bow and berries.


Copic Colors
Ribbon- R59, R27, R24, R22
Wreath- YG67. YG17, YG13, YG11
Noses- T7, T5, T3
Dog left- E55, E31, E30, E41, E40
Dog right- E27, E25, E23, W0, W1, W00, E42


Would you like to win the “Holiday Haul” or the “Wreath Pups” Stamp Set? We will choose ONE lucky winner for each stamp set!

Here's how to win: Comment on the NND blog and Design Team blogs (see list below)! The winner will be chosen at random from the collective reveal posts. Make sure to check out each of their blogs and comment for your chance to win. You will not know which blog has been chosen so the more you comment on the better your chances are of winning! You have until Thursday October 13th at 9pm ET to comment  -- winners will be announced on the blog post on Friday October 14th. 

Check out all the awesome Design Team Blogs below to enter:

Newton's Nook Designs

Donna Idlet

Ellen Haxelmans

Tina Herbeck

Larissa Heskett

Samantha Mann

Zsofia Molnar

Maria Russell

Farhana Sarker

Tatiana Trafimovich

Amanda Wilcox


Thanks so much for stopping by! Have a great day :)


Monday, October 10, 2022

Newton's Nook Designs Holiday Release Day 1

Hi crafty friends! I'm so excited to share Day1 of the Newton's Nook Designs Holiday Release! Today we are revealing the Holiday Heights stamp and coordinating die, a new stencil and two new paper pads! Here is what I created:


I decided to create a slimline card featuring the new stamp and stencil. First I stamped the adorable kitties image and colored it up using Copic markers (colors listed below).  To create the background I drew the tree line using a pencil and cut it out to create a mask. I stenciled the trees using green Distress inks and texture paste. Then I masked the back row of trees and ink blended the sky. I cut the panel out using the Slimline Frames & Portholes Die and added a snow bank using the Land Borders Die Set.


I stamped and embossed the sentiment and snowflakes and added some splatter using white acrylic paint. I popped up the image using double sided adhesive foam tape and for a finishing touch added some sparkle marker to the ornaments and star.

Copic Colors:
Tree & Ornaments- YG17, YG13, YG11, BG15, BG13, BG11, R27, R24, R22, Y28, Y26, Y13, Y11
Kitties- E99, YR24, YR14, YR12, YR00, YR000


 Would you like to win the “Holiday Heights” Stamp Set? This stamp set will be given away to ONE lucky winner!

Here's how to win: Comment on the NND blog and Design Team blogs (see list below)! The winner will be chosen at random from the collective reveal posts. Make sure to check out each of their blogs and comment for your chance to win. You will not know which blog has been chosen so the more you comment on the better your chances are of winning! You have until Thursday October 13th at 9pm ET to comment  -- winners will be announced on the blog post on Friday October 14th. 

Thanks so much for stopping by! Have a great day :)

Wednesday, October 5, 2022

Trick or Treat Cat O' Lantern Halloween Card

Hello crafty friends! I have a card to share with some more Halloween inspiration using some stamps and dies from Newton's Nook Designs. All the colors and supplies I used are listed at the bottom of this post :)

To create my card first I stamped and embossed the images. I colored the kitten and pumpkin using Copic markers (colors listed below) and cut it our using the coordinating dies. I masked around the spider web and inked it using Distress Oxide Inks. I cut the oval out using the Oval Frames Die set. 

To create the background layers, I simply cut the patterned papers from the Halloween Meows and Halloween Woofs papers into rectangles using my paper cutter. I layered the purple striped pattern with some black card stock. I glued it all down and popped up the kitten using double adhesive foam tape.


 For a finishing touch I added some sparkly purple gemstones. Thanks so much for stopping by! I hope you like my card. Below you can find links to the Newton's Nook shop and the colors I used. Have a great day :)

Supplies Used

Copic Colors
Cat fur: T5, T3,, E37, E34, W1, W0, W00
Ears: E01, RV00
Eyes: YG93
Hat: T7, T5, T3, T1, V17, V15, V12
Pumpkin: YR18, YR16, YR14, YR12, Y21, YR00

Distress Oxide Inks
Black Soot
Villainous Purple
Shaded Lilac


Labels

Birthday (5) Birthday Projects (18) Card In A Box (11) Christmas (3) Christmas Projects (57) Coffee theme (2) Craftin Desert Diva's Stamps (157) Easel Card (3) Easter Projects (24) Fall Projects (17) Flip Book (4) Gerda Steiner Designs (2) Get Well Projects (1) Gina Marie Designs (14) Goody Bags (1) Graduation (4) Halloween (2) Halloween projects (30) Happy New Year (1) Harry Potter (4) Hello Bluebird Stamps (1) Hello Kitty (2) Hero Arts (2) Honey Bee Stamps (1) Jaded Blossom (429) Jessica Lynn Original (2) KaDoodle Bug Designs (2) Lawn Fawn (10) Loaded Envelope (1) Lori Whitlock (7) Love Cynthia Stamps (1) Mama Elephant Stamps (5) Masculine Projects (2) Memorydex - Rolodex (2) Mermaids (2) Mini Albums (1) Miss Kate Cuttables (1) Mother's Day (3) My Creative Time Stamps (24) My Favorite Things Stamps (1) My Scrap Chick (7) My SVG's (5) Newtons Nook (101) Planner (14) Pocket Letter (8) Pooh and Friends (5) Pretty Paper Pretty Ribbons (2) Pretty Pink Posh (3) Rilakkuma (1) Shaker Cards (28) Shaped Card (1) Sister Stamps (1) Slimline Cards (11) Spellbinders (20) St.Patrick's Day (4) Stamp Anniething (156) Stampendous (1) Star Wars (2) SVG Cut Club (39) SVG Cuts (2) SVG Cutting Files (85) SVG Made By Me (2) Swap (1) Thank You (1) The Dreaming Tree (1) The Rabbit Hole Designs (4) Tim Holtz (1) Tina's Cute Critter Challenge (2) Valentine's Day Projects (35) Waffle Flower (1) We R Memory Keepers (1) Wedding Projects (2) Winter Projects (4) You Tube Video Tutorial (227) Your Next Stamp (2)