Showing posts with label Card In A Box. Show all posts

Saturday, July 11, 2015

Sending Birthday Fishes Aquarium Box Card

 Hello friends! Today I am sharing with you an aquarium style 3D box card and my very first you tube video.

I'm not going to lie here...this was a complete headache. I ran into the problem of old technology not wanting to play nice with new technology so I had to salvage my footage with an older video program. I learned a lot and for my next tutorial I will be using a better program and it should be so much easier. It is kind of long but I know that you will enjoy making one of these cards! They are so cool and I am thrilled with how it turned out!!!


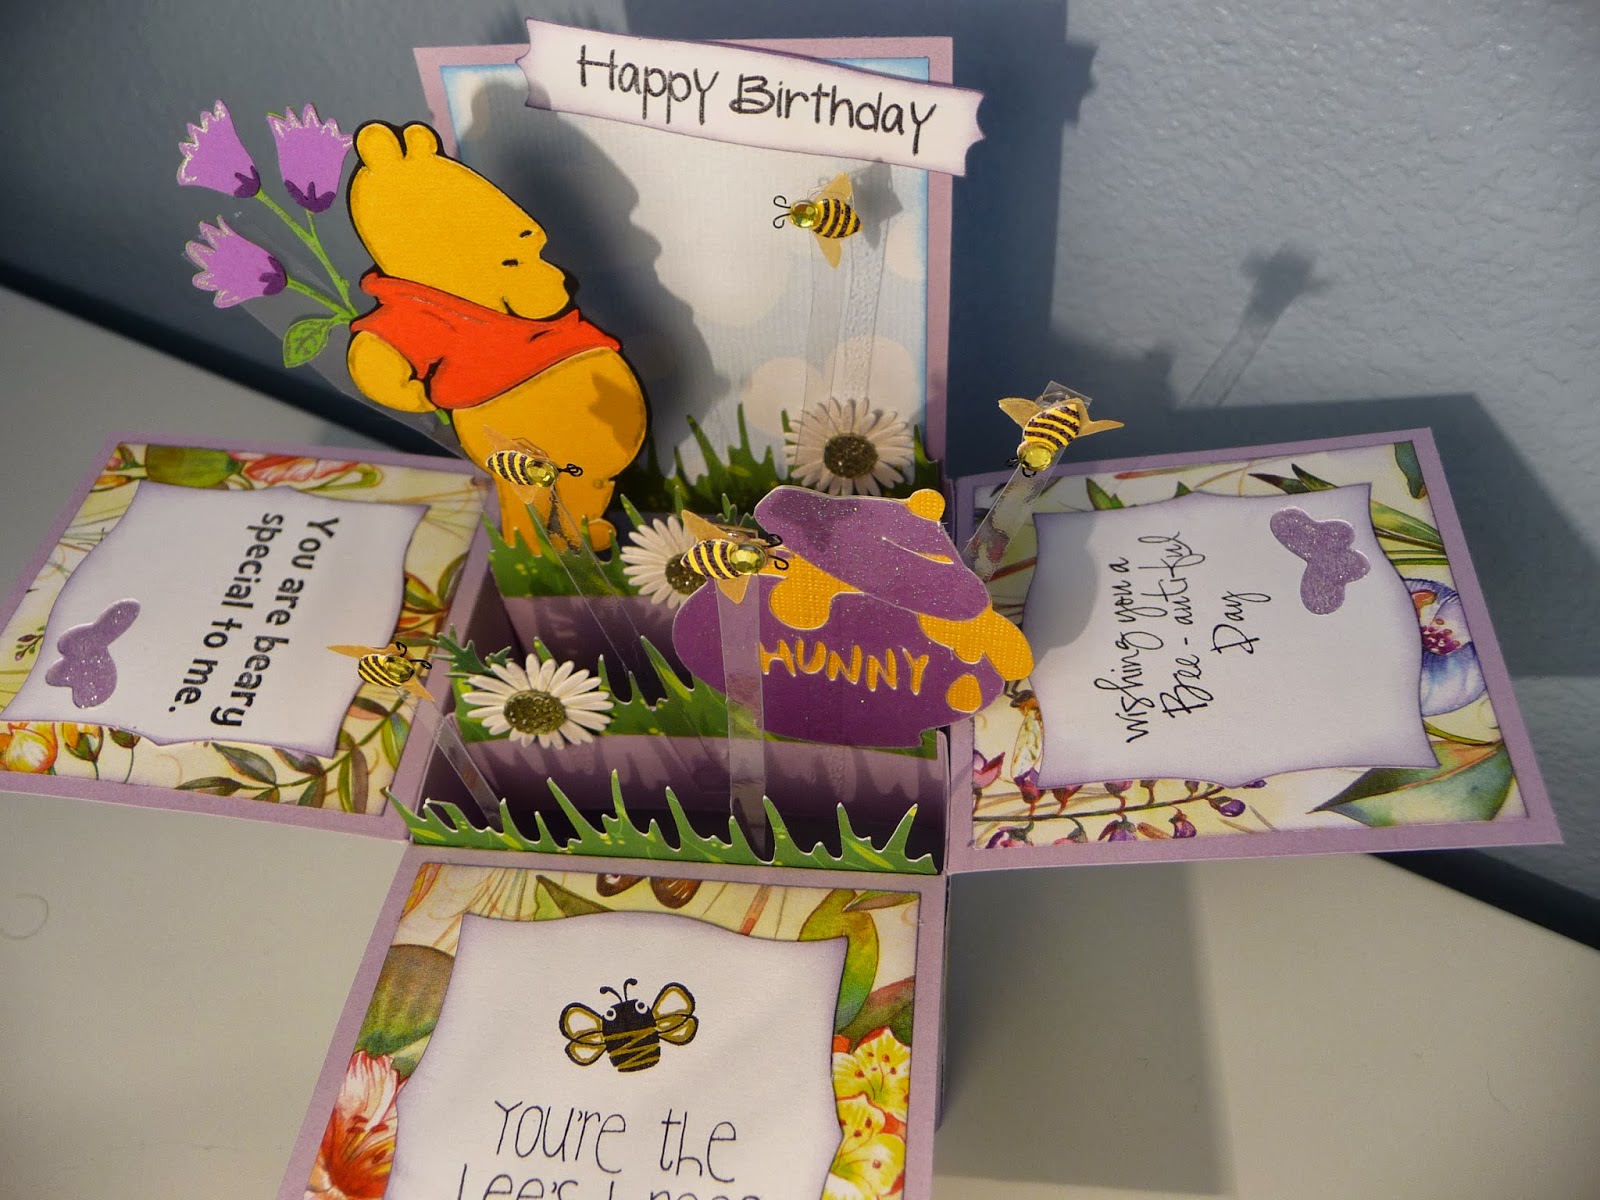
This card was inspired by my friend Eunice at A Star For Chiemi blog. She made a box card for her dad with a couple Nemo fishes and I just had to make one of my own. I designed my card in Design Space but I am also working on making it into an SVG. The Cricut cuts are from the Life Is A Beach cartridge. I used the Craftin Desert Diva's Under The Sea stamps, the little crab from Crabby and the star from Wish Upon A Star. 


Here are the stamps and dies I used and you can find these and so much more at the Craftin Desert Diva's Shop.


Click HERE
Click HERE

Click HERE

Click HERE

Thanks so much for hoppin by!!

Have a blessed day!

Saturday, October 4, 2014

Witch Crossing Card in a Box


Today is the New Mini Release and Facebook Fan Page Hop starting at the Craftin Desert Diva's Facebook Page! I am so excited to be part of such an amazingly talented group of crafters on this Design Team! Tara is having a SALE during this hop! Use Code: MINI to receive 20% off your entire purchase!! Sale ends Sunday at 12pm MST. Also with a minimum 2 stamp purchase you will receive the September Spider freebie stamp and TCBJ Halloween Bears SVG pattern. They're perfect for Halloween!

Here is my Hop project:

I used the NEW stamp set called Witch Crossing to make a Card in a Box!


One of the wonderful things about the CDD stamps is they come with free SVG's to make stamping so easy! I made a large box card and used my Plantin School Book Cartridge to cut silhouettes of the row of houses, trees, and mountains.


The papers are from the DCWV Once Upon A Time Stack. The clouds are from the Zooballoo cartridge. The bats are from K & Company. 


I used my Spectrum Noir pens to color the adorable witchy bears. The sentiment is also from this new set. And I just love how these box cards fold flat to fit inside my custom made envelope.  


If you have not hopped make sure you get on over to the Craftin Desert Diva's facebook page and join us both Saturday and Sunday for the freebies and some fabulous projects! 

Click HERE to Shop!!

Saturday, August 30, 2014

My Mr.Incredible Birthday Card

Hello and happy weekend! Yesterday we celebrated my hubbies birthday. He has been doing an amazing job with his fitness routine. He says he's feeling better and more fit than ever before. I wanted to make him a card and birthday theme to represent his hard work. Here's my project!

We are huge Disney fans in my house and I thought what would be 
better for hubby than Mr.Incredible! 


I used my Cricut Disney's Best of Pixar and the CTMH Artiste cartridges. I made a large Card in the box and of course cut out Mr.Incredible as the main feature. The starbursts and words "pow" and "zap" are all cut from Best of Pixar as well as the "i" symbol. The gable box is from Artiste.


The sparkly gold star cardstock is from the DCWV Edumacation stack. The black and gray cardstock is from a Darice Black and White paper pack. I used Creative Memories mini alphabet stickers for the title. 


The stamps are from My Craft Spot "Build a Birthday." I LOVE this stamp set! So many possibilities! I then added some black rhinestones to give it a little extra but not too much bling. Masculine cards are extra challenging because you can't put too many embellishments or you risk making it too feminine.


The gable box was cut at fit to page to be as large as I could make it.  I added some Wink of Stella clear pen to the icon to give it an extra shimmer. I filled the boxes with candy to give to my hubby and kids. They were a hit!


I hope you liked my project for today! I will participate in the following challenges:


Hope you have a wonderful holiday weekend!


Sunday, May 25, 2014

Baby Boy Shower Card in a Box


Hi there my crafty friends! Today I have another Card in a Box that I made for an employee at my hubbies work. She is having her first baby and we couldn't be happier for her:) This card was a lot of fun to make and I thought it turned out super cute! Let me show you what I did....


First off I used a medium blue cardstock for the box. I went through all my paper stacks and decided to use this Debbie Mumm baby paper. The pattern has different shades of blue strips with different colored stitching. It is so cute. I thought about using an additional pattern but went with a lighter shade of blue cardstock instead, and used my Cuttlebug and Swiss Dots folder.


I used 3 Cricut cartridges for this design. First I cut the airplane and banner from the New Arrival cartridge. I used peach and green for the cut. The green coordinates with some of the stitching in the paper on the sides of the box.  I used 2 stamp sets to stamp It's a Boy! on the banner. They were from Pink By Design and Joys Life Stamps.  The clouds were from the Zooballoo cartridge. I love those clouds. I inked them with a skyblue colored chalk pad. I inked all the other cuts with the Tim Holtz Tea Dye Distress Ink.  


The adorable baby is from the Baby Steps Cartridge. He is the baby that is on the moon but I decided to use the airplane instead. The baby is cut at 2.25". Interestingly enough the cut size for this does not include the moon even though the moon is part of the main image. Usually the size you choose on the Cricut is for the height on the main image. But on my expression the 2.25 inch is exactly what the baby cuts out as so when you choose 2.25 inches the entire cut is almost 4 inches when you use the moon cut. I hope that makes sense. Anyway, I cut the teddy at 2 inches and the ducky at 2 inches (which is a cut that goes on a baby pin). I chose a green and blue plaid paper for the onesie, hat and teddy diaper.  I added a little stitching on the bears face. 


I used a vellum sentiment for the front flap and used some 3D stickers that I bought on HSN a couple years ago.  I did add the buttons to the wheels on the car and the pacifier to give it a little more dimension. I finished it off with a white ribbon and this is how it looks folded down flat.

I hope you like my card. It was so fun making it!  I will participate in the following challenges:


Thanks so much for stopping by. I hope you have a wonderful and crafty day :)


Friday, May 9, 2014

Teddy Bear Garden- Mother's Day Card In a Box

Hello to you my crafty friends! Thanks for visiting my blog today. I made a Mother's day Card in a Box for my dear mom. My mom loves teddy bears and roses. So when I thought of what I would make for her I came up with this! I am so happy with how it turned out.  It may just be my favorite Card in a Box so far. I craft with critters and I usually don't do many floral designs but I really wanted to make one of these cards with the flowers bursting out like what you see on Pinterest. But I had to have my critter in there somewhere too, sooooo......Here it is!


I've had my eye on this little bear from the Cricut Create a Critter 2 cartridge and thought she would be just perfect. For the flowers I wanted lots of detail so I thought I better dust off my Imagine. I pulled out my Lori's Garden Cartridge and went to work. This cartridge has the most beautiful designs. I wish Provo Craft would have stuck it out with this machine because it is quite fabulous when it works like it should. I guess I'm lucky because it has worked just fine for me.


 I used Cream cardstock and cut my box card. I used this beautiful glittery damask DCWV Cardstock for all the layers both interior and exterior. I added a pale pink ribbon to the outside. All the rest of the design was printed and cut with my Imagine machine including the bear and hat. I love how easy it is to coordinate colors with my Imagine.  


I layered a couple small Prima flowers with a rhinestone brad to add bling to her hat. I used pearls to make her a necklace and add dimension to her eyes. I chalked her cheeks and used Glossy Accents on her little nose. The stamp is from My Pink Stamper- Happiest Moments. I wish the colors and papers showed up as vibrant and glittery in these pics as they are in person. Isn't she cute! She looks so happy in the garden with the butterflies flying about. I hope my Mom enjoys her card as much as I enjoyed making it!


I will be participating in the following challenges:


Thanks so much for visiting. 

I wish you a very Happy Mother's Day!

 Tina H

The Scrappin Rabbit


Mother's Day Tea- Card in the Box

Hello Crafty Friends! Mother's Day Weekend is here and I have a card for the occasion. Of course it is another Card In A Box! I imagine everyone I make cards for will want one of these this year so I will be making plenty more. 
This card took me 5 Cricut Cartridges to make, lol! I had been thinking for a while that I wanted to do one with a window. The Creative Cards Cartridge has a great window so I used that one at 3.5". I cut the curtain layer out larger than the window (4.25") as it would look on the inside of the house. 


This particular card is for my husbands wonderful step-mom. She loves cats like me so I had the idea for a cat sitting in that window. I used cloud paper scraps to make it so the cat could be peering outside. The cat silhouette is from A Child's Year Cartridge. He is cut out at 1.75".  Being that the card would be the inside of the house I thought I would decorate it like a tabletop. It took a while to sort it out but this is what I came up with! The adorable teapot and cups are from the Love You A Latte Cartridge. I just love the lacy trim. There were no saucers so I just cut out ovals. I found the little cake from the Sweet Treats Cartridge and also the decorative tag. 


I embossed the white cardstock with my Cuttlebug Birds and Swirls folder and used a border punch to try to make it look like a tablecloth. I found the vase and flowers on the Everyday Pop Up Cards Cartridge and cut it at 2.5". I added pearls and bling to the flowers and cake. 


I wanted a simple look so I used the solid colored cardstock. I added an additional insert for the cups because I didn't like them flush to the front. I was tempted to add more but I am happy with how it turned out. I didn't ink anything this time trying to give it more of a fresh and clean look. 


I hope she likes it! This is the larger size Card In the Box so I took it to the Post Office, paid the extra postage, and sent it off. Here's the backside. The sentiments are from Fiskars- Latte Love, My Pink Stamper-Happiest Moments and Docerela Stamps- Lovable.


I hope you like my card. I sure had a great time making it! I will be participating in the following challenges:


Thanks for stopping by and have a Happy Mother's Day!

Tina H 

The Scrappin Rabbit


Friday, April 11, 2014

Hog Wild Birthday Card In a Box

Today I have a card I made using 3 Cricut cartridges that I have had for a long while and had not used til now: Country Life, County Fair, and Easter 2010. I actually have a ton of cartridges that I have yet to even open. If only I could camp out in my Craft room for a week or more I might be able to crack a dent into the hidden treasures of that room! This card I made for my amazing Aunt's birthday. She loves the country and the critters especially piggies.


I made another Card in a Box which I have been getting a lot of compliments on. These cards pop open and leave such a smile on the faces of the recipients. They fold flat and can be placed in an envelope. I just love them!


I created the farm scene using the barn from the County Fair. I inked and embossed the front layer of the barn to add a cool dimension. I also got the fence and chicken from this cartridge. I cut the chicken layers out a bit bigger than the fence so it would cut out right. The design papers are from the 12x12 DCWV Kitchen Stack that I picked up at Joann's for $6! (Always lookin' for a bargain :)


The pig and chicken, and grass hills are cut from the Country Life cartridge. I think I bought this cartridge just for this pig cut! And the sewing machine, which I have plans to make for a future card. The clouds are from Zooballoo and the bunny from Easter 2010. Omgosh that cartridge is full of bunny goodness that I have yet to explore! The bee and white bird are from Jolees. They are so tiny and cute and I cut my Cricut case into strips to attach them. They are so cute and sway when you move the box.  I used my computer to type the sentiments since I didn't have any stamps to fit the occasion. I inked and blinged and added a cottontail to the bunny as well as a red ribbon to the front. 


I hope you enjoyed my card. As you know the details don't quite make it into the photos but I tried to get some good angles. I will participate in the following challenges:


Thank you so much for stopping by!

I hope you have a wonderful and crafty day!

Tina H.
The Scrappin Rabbit


Monday, March 10, 2014

Pooh Card in a Box


What a crazy last few weeks! I had 2 shows and got real sick with the flu right smack in the middle of them! Needless to say I am way behind on all my crafting:(  I spent this last week working on this card for my sister's birthday. Of course it is late but I'm hoping the "better late than never" saves me on this! We plan on doing a get together with my mom so I can give it to her then.  


So I made yet another card in a box (I'm loving these!) She is a big fan of Winnie the Pooh so I chose that for my theme. The Pooh and honey pot die cuts are from the Pooh and Friends Cricut Cartridge.  The papers and cardstock are all from my scraps box so I have no memory of where they came from.  The cute little bees and daisies are from Jolees. I found those on sale a while back and just knew I would make something with them for my sis.  


I used the plastic from the Cricut cartridge outer shell to prop up those bees.  The banner and fancy butterfly square cuts are from the Elegant Edges Cartridge. I used stamps from Pink By Design, My Pink Stamper and Joy's Life. 


I love the look of Spring as we are definitely there here in So. California. My allergies have kicked in on top of what's left of my cold. 

I didn't go crazy with inserts this time and the card should fit in my leftover envelopes from my Costco Christmas Cards.  I haven't made the A2 size card yet and I do really like these bigger ones. But I plan on making the smaller ones soon.


Now I am off to work on some more projects for my Daughter's birthday party and just maybe if I'm successful I will get them posted. I'm always bummed when I don't have time to photograph them and get them on my blog. I love the bloggy world of paper crafting and was lucky enough to win some DCWV stacks from the blog Hiding in My Craft Room. I just got them in the mail today and can't wait to use them :) 

I will participate in the following challenges:


Thanks so much for stopping by!

Sunday, February 16, 2014

"You Rock" Birthday with Imagine JT

Valentine's Day is also my Father-in-law's birthday. We celebrated a special day just for him on Saturday. He is a musician just like me and plays gigs regularly doing shows and re-enactments while singing and playing his guitar at Elementary schools. I thought it would be fun to make a guitar card. I really like the responses to these card in a box cards. This is my third one. They are extra special when they open up. For more info on this card you can click here . I wanted to use my Imagine machine and I used my JT Cartridge for the first time.


The papers are all printed from my Imagine. I just love the masculine feel of this cartridge. It is especially challenging for me to make guy cards.


The guitar is a cut from the Hannah Montana cartridge. I added some red glitter to give it a bit of sparkle hopefully without being too sparkly. The black knobs on the neck of the guitar are from Michaels Recollections embellishments.


I took pics with and without the flash. It was early morning so I didn't have the best lighting in my room. I made the guitar quite big at 1.5 inches wide which extended the neck well past the top of the box. It made fitting it for the envelope a bit difficult.  I want to try the smaller version that fits in an A2 envelope but I am afraid it might be too small. This card stands out because of it's size I think. 


I handmade some heart candies and baked my special recipe chocolate cupcakes. They were a hit and I only ate one. (Proud of myself...it's hard for me to resist chocolate and I am now on the quest of "shedding my winter coat" so to speak :)


Thanks for stopping by and have a great day! I will participate in the following challenges:


Labels

Birthday (5) Birthday Projects (18) Card In A Box (11) Christmas (3) Christmas Projects (57) Coffee theme (2) Craftin Desert Diva's Stamps (157) Easel Card (3) Easter Projects (24) Fall Projects (17) Flip Book (4) Gerda Steiner Designs (2) Get Well Projects (1) Gina Marie Designs (14) Goody Bags (1) Graduation (4) Halloween (2) Halloween projects (30) Happy New Year (1) Harry Potter (4) Hello Bluebird Stamps (1) Hello Kitty (2) Hero Arts (2) Honey Bee Stamps (1) Jaded Blossom (429) Jessica Lynn Original (2) KaDoodle Bug Designs (2) Lawn Fawn (10) Loaded Envelope (1) Lori Whitlock (7) Love Cynthia Stamps (1) Mama Elephant Stamps (5) Masculine Projects (2) Memorydex - Rolodex (2) Mermaids (2) Mini Albums (1) Miss Kate Cuttables (1) Mother's Day (3) My Creative Time Stamps (24) My Favorite Things Stamps (1) My SVG's (5) My Scrap Chick (7) Newtons Nook (101) Planner (14) Pocket Letter (8) Pooh and Friends (5) Pretty Paper Pretty Ribbons (2) Pretty Pink Posh (3) Rilakkuma (1) SVG Cut Club (39) SVG Cuts (2) SVG Cutting Files (85) SVG Made By Me (2) Shaker Cards (28) Shaped Card (1) Sister Stamps (1) Slimline Cards (11) Spellbinders (20) St.Patrick's Day (4) Stamp Anniething (156) Stampendous (1) Star Wars (2) Swap (1) Thank You (1) The Dreaming Tree (1) The Rabbit Hole Designs (4) Tim Holtz (1) Tina's Cute Critter Challenge (2) Valentine's Day Projects (35) Waffle Flower (1) We R Memory Keepers (1) Wedding Projects (2) Winter Projects (4) You Tube Video Tutorial (227) Your Next Stamp (2)